Quick Start
Welcome to ZenMux! This guide walks you through everything from signing up to making your first API request, step by step.
💡 Get Started in 4 Steps
Just four simple steps to start using ZenMux:
Sign in to ZenMux: Visit the ZenMux login page and sign in using any of the following:
- GitHub account
- Google account
Choose a usage plan: Based on your use case, select Pay As You Go or Builder Plan.
Get an API key: After signing in, create an API key from the corresponding management page.
Make your first request: Pick the API protocol you're most familiar with, copy the code example below, replace your API key, and run it.
Choose a Usage Plan
ZenMux offers two usage plans to fit different scenarios:
Pay As You Go
Best for: Production environments, commercial products, high-concurrency applications
Pay As You Go uses a prepaid balance + usage-based billing model, purpose-built for production workloads:
- No rate limits — supports high-concurrency calls
- Per-token billing — transparent and predictable costs
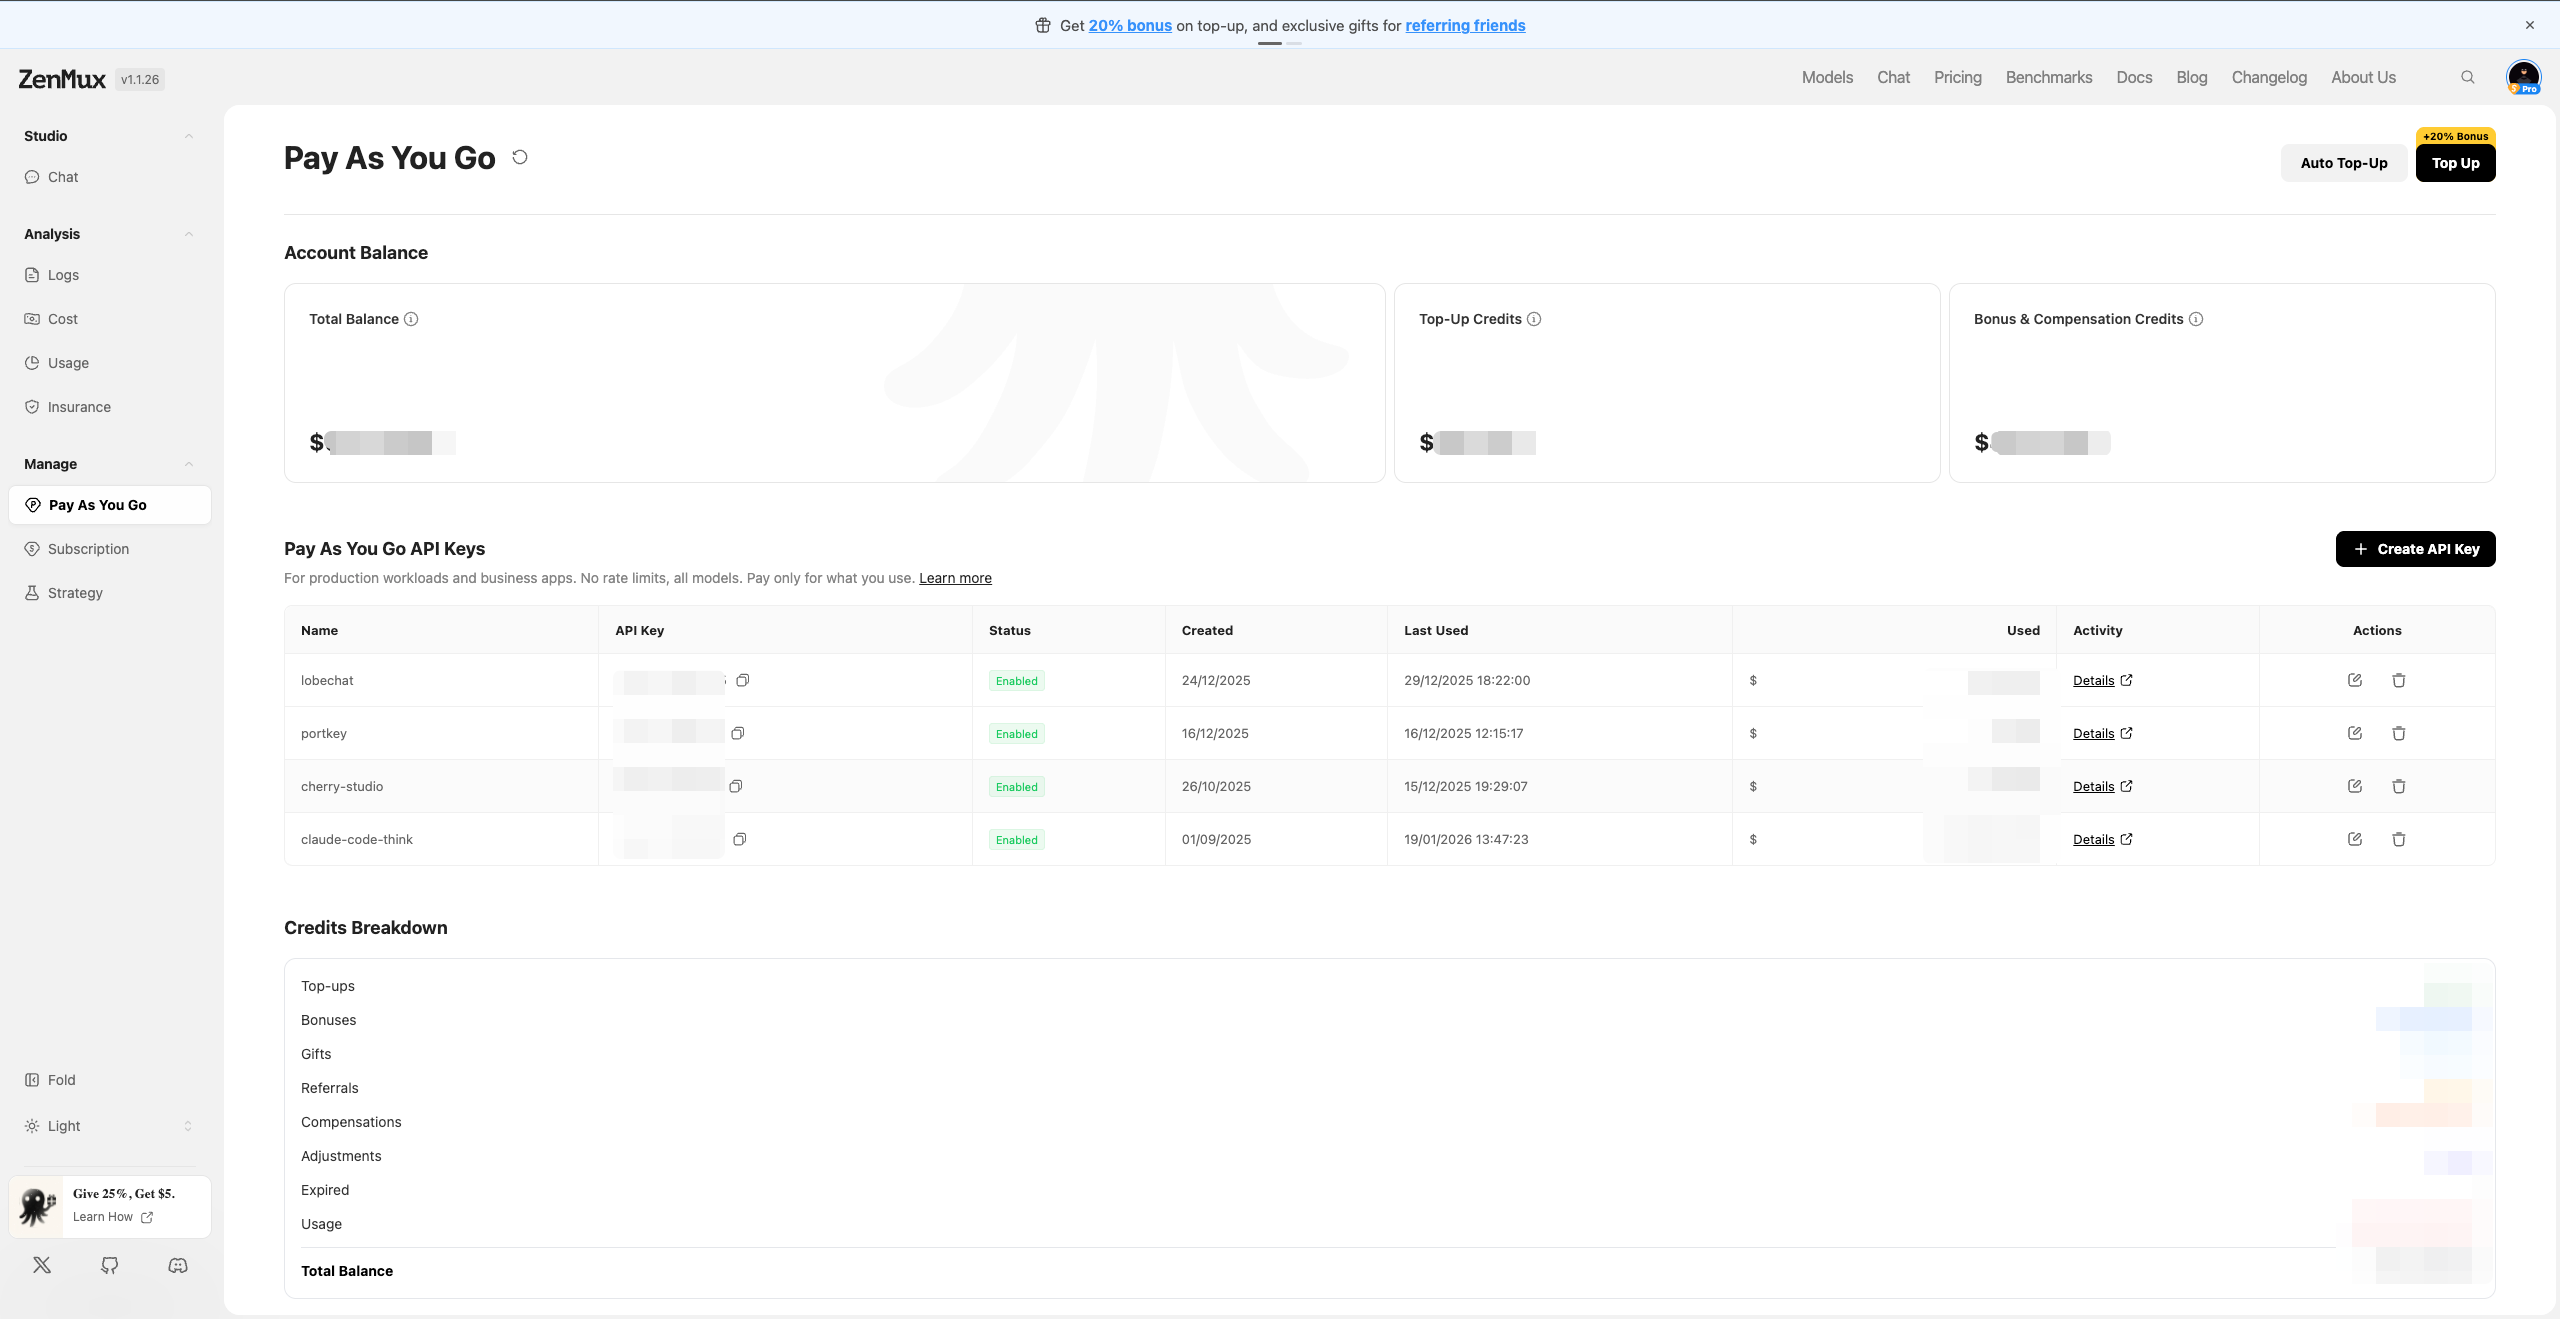
Go to the Pay As You Go management page to top up your balance and create an API key.
📚 Detailed Guide
For complete instructions, see the Pay As You Go Guide.
Builder Plan (Subscription)
Best for: Personal development, learning and exploration, Vibe Coding, rapid prototyping
Builder Plan provides a fixed monthly fee with predictable AI model access:
- Fixed monthly fee starting at $20/month
- All-star model lineup — one subscription unlocks 100+ top models worldwide
- Full-scenario coverage — Coding + image generation + video generation + chat, all in one place
Go to the Pricing page to view plan details and subscribe.

📚 Detailed Guide
For complete instructions, see the Subscription Plans Guide.
Plan Comparison
| Dimension | Pay As You Go | Builder Plan (Subscription) |
|---|---|---|
| Best for | Production, commercial products | Personal development, learning |
| Billing | Usage-based, per-token | Fixed monthly fee |
| Rate Limit | Unlimited | 10–15 RPM |
| Concurrency | Unlimited | Weekly Limit applies |
| Restrictions | None | Not allowed for production use |
⚠️ Important
If your project is already live or heading toward commercialization, you must use the Pay As You Go plan. The subscription plan is strictly for personal development and learning — production use is prohibited.
How to Obtain Model Slugs
Each model on the ZenMux platform has a unique slug. You can find model slugs on the Models page: 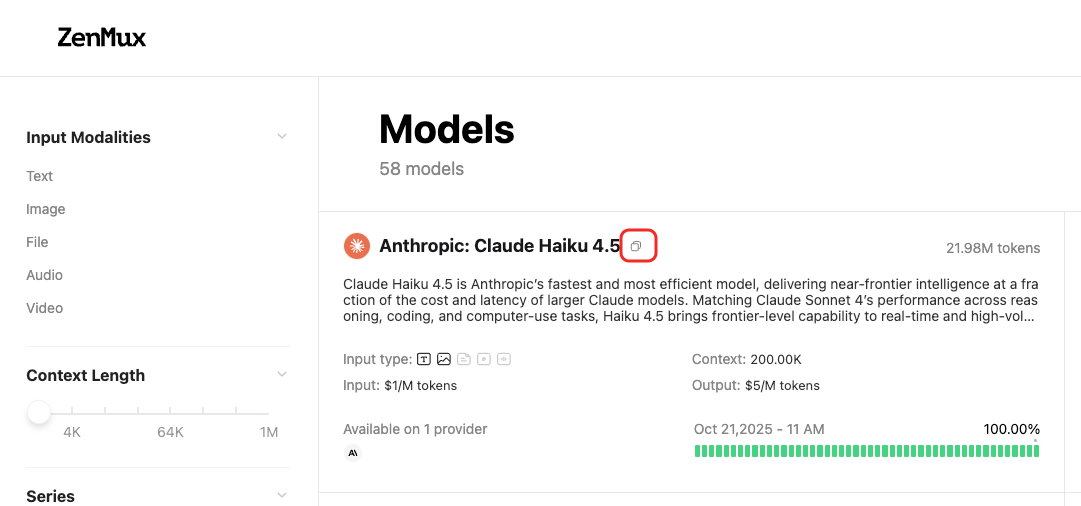 Or on a model's detail page:
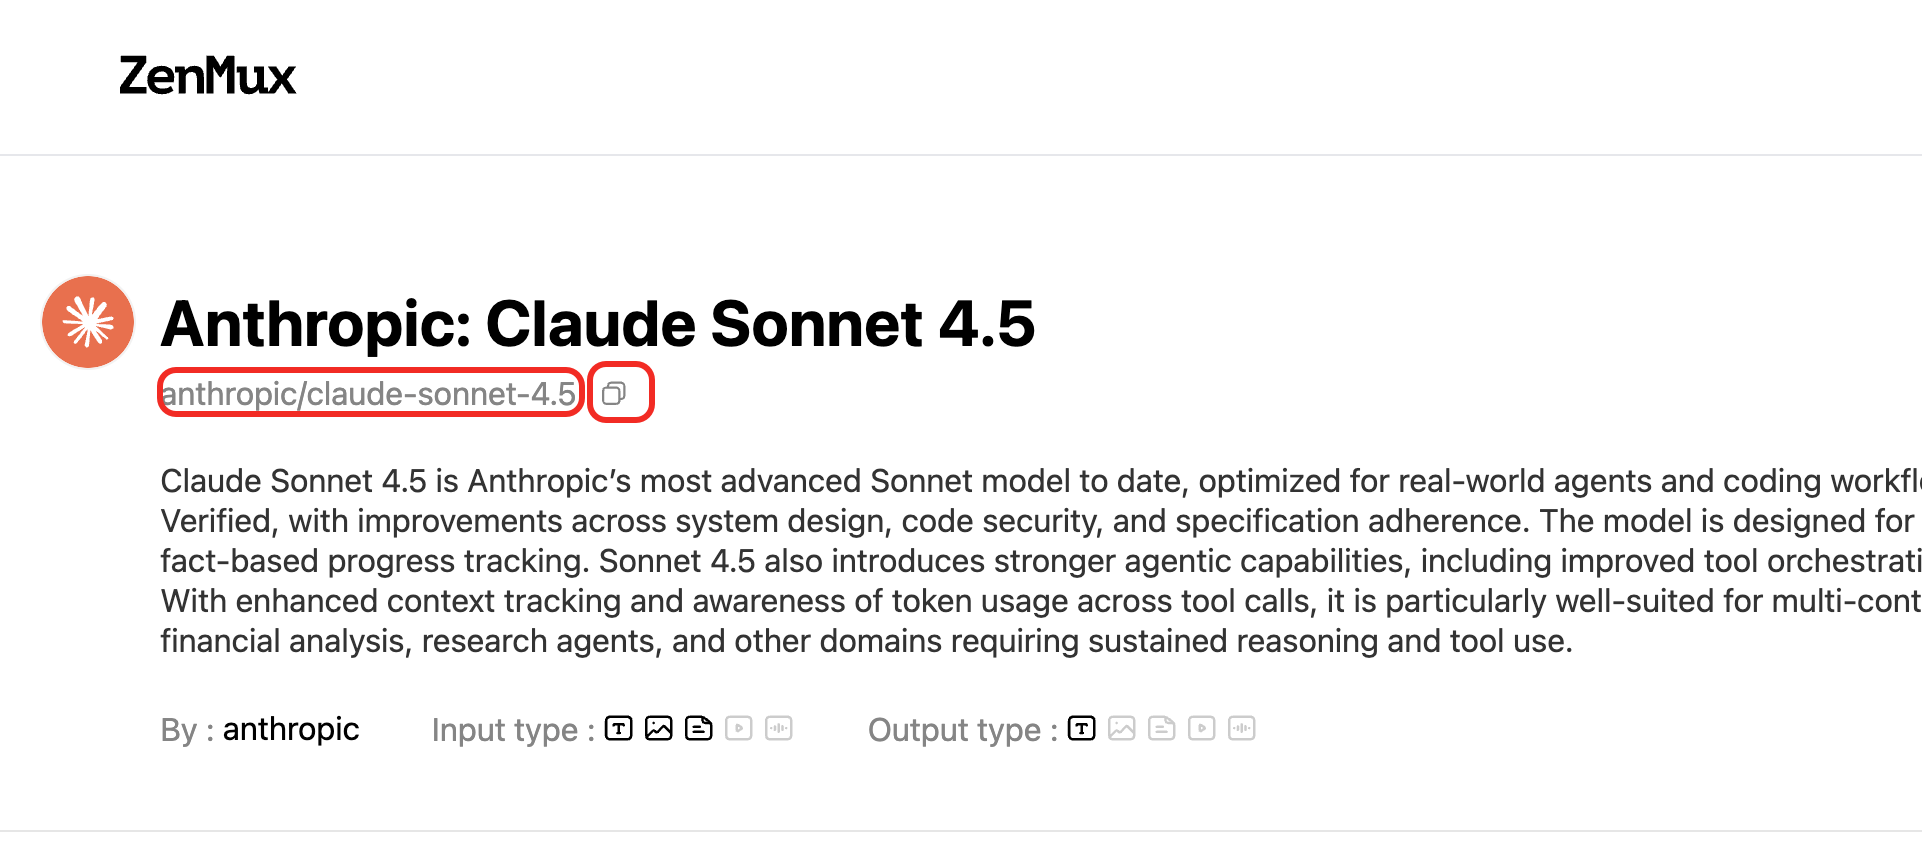
Supported API Protocols
ZenMux supports four major API protocols, letting you use your preferred SDK to call any model on the platform:
| Protocol | Base URL | Compatible SDK | Description |
|---|---|---|---|
| OpenAI Chat Completions | https://zenmux.ai/api/v1 | OpenAI SDK | The most widely used Chat API |
| OpenAI Responses | https://zenmux.ai/api/v1 | OpenAI SDK | OpenAI's next-gen Responses API |
| Anthropic Messages | https://zenmux.ai/api/anthropic | Anthropic SDK | Native protocol for the Claude family |
| Google Gemini | https://zenmux.ai/api/vertex-ai | Google GenAI SDK | Native protocol for the Gemini family |
💡 Cross-Protocol Calling
One of ZenMux's core strengths is protocol agnosticism — you can call any model through any supported protocol. For example, use the OpenAI SDK to call Claude models, or the Anthropic SDK to call Gemini models.
Protocol 1: OpenAI Chat Completions
Compatibility
ZenMux's API endpoint is fully compatible with the OpenAI Chat Completions API. Just change base_url and api_key to switch seamlessly.
from openai import OpenAI

# 1. Initialize the OpenAI client
client = OpenAI(
    # 2. Point the base URL to the ZenMux endpoint
    base_url="https://zenmux.ai/api/v1",
    # 3. Replace with the API key from your ZenMux console
    api_key="<your ZENMUX_API_KEY>",
)

# 4. Create a Chat Completion request
completion = client.chat.completions.create(
    # 5. Specify the model in "provider/model-name" format
    model="google/gemini-3.1-pro-preview",
    messages=[
        {
            "role": "user",
            "content": "What is the meaning of life?"
        }
    ]
)

print(completion.choices[0].message.content)import OpenAI from "openai";
// 1. Initialize the OpenAI client
const openai = new OpenAI({
// 2. Point the base URL to the ZenMux endpoint
baseURL: "https://zenmux.ai/api/v1",
// 3. Replace with the API key from your ZenMux console
apiKey: "<your ZENMUX_API_KEY>",
});
async function main() {
// 4. Create a Chat Completion request
const completion = await openai.chat.completions.create({
// 5. Specify the model in "provider/model-name" format
model: "google/gemini-3.1-pro-preview",
messages: [
{
role: "user",
content: "What is the meaning of life?",
},
],
});
console.log(completion.choices[0].message.content);
}
main();curl https://zenmux.ai/api/v1/chat/completions \
-H "Content-Type: application/json" \
-H "Authorization: Bearer $ZENMUX_API_KEY" \
-d '{
"model": "google/gemini-3.1-pro-preview",
"messages": [
{
"role": "user",
"content": "What is the meaning of life?"
}
]
}'Protocol 2: OpenAI Responses
Compatibility
ZenMux is also compatible with OpenAI's next-gen Responses API. The base URL is the same as Chat Completions, with a more streamlined calling convention.
from openai import OpenAI

client = OpenAI(
    base_url="https://zenmux.ai/api/v1",
    api_key="<your ZENMUX_API_KEY>",
)

# Create a request using the Responses API
response = client.responses.create(
    model="google/gemini-3.1-pro-preview",
    input="What is the meaning of life?"
)

print(response.output_text)import OpenAI from "openai";
const openai = new OpenAI({
baseURL: "https://zenmux.ai/api/v1",
apiKey: "<your ZENMUX_API_KEY>",
});
async function main() {
const response = await openai.responses.create({
model: "google/gemini-3.1-pro-preview",
input: "What is the meaning of life?",
});
console.log(response.output_text);
}
main();curl https://zenmux.ai/api/v1/responses \
-H "Content-Type: application/json" \
-H "Authorization: Bearer $ZENMUX_API_KEY" \
-d '{
"model": "google/gemini-3.1-pro-preview",
"input": "What is the meaning of life?"
}'Protocol 3: Anthropic Messages
Compatibility
ZenMux fully supports the Anthropic Messages protocol and integrates seamlessly with tools like Claude Code and Cursor.
Note that the Anthropic protocol uses base_url https://zenmux.ai/api/anthropic, which differs from the OpenAI protocol.
Anthropic Protocol Model Support
Models compatible with the Anthropic protocol are being adapted in batches. You can view currently supported models by filtering for Anthropic API Compatible on the official model list: 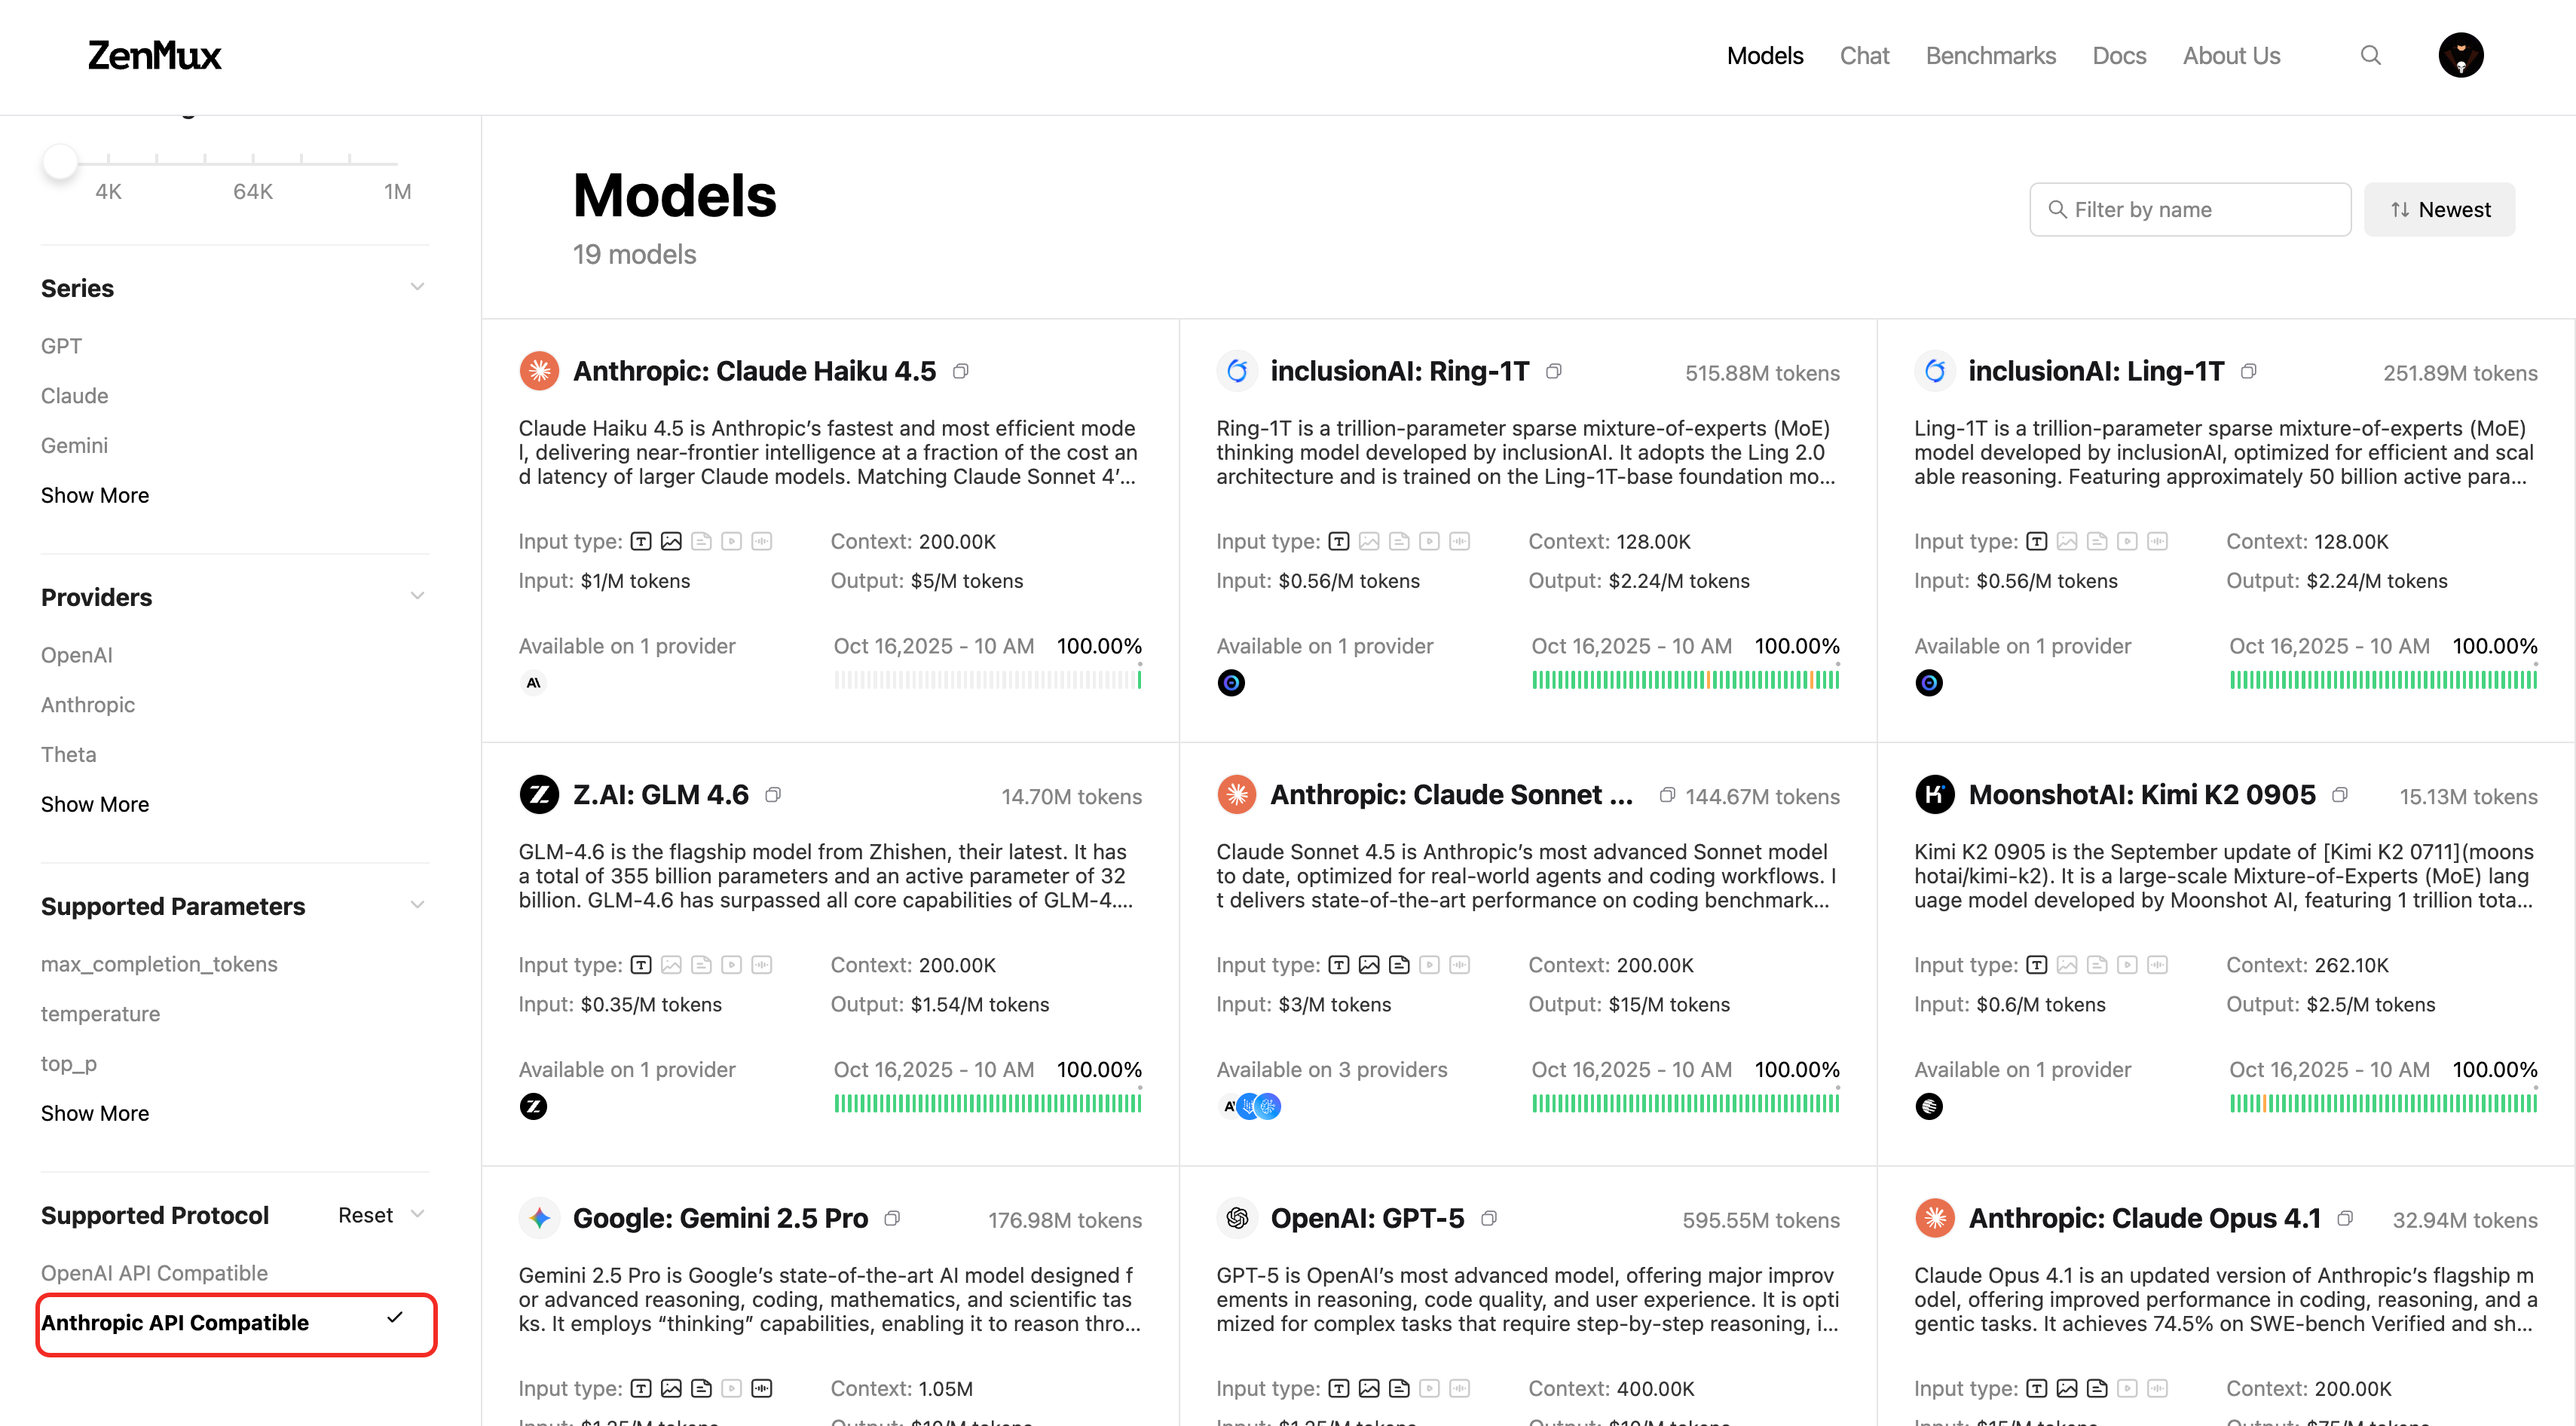 You can also check on a model's detail page:
from anthropic import Anthropic

# 1. Initialize the Anthropic client
client = Anthropic(
    # 2. Point the base URL to the ZenMux endpoint
    base_url="https://zenmux.ai/api/anthropic",
    # 3. Replace with the API key from your ZenMux console
    api_key="<your ZENMUX_API_KEY>",
)

# 4. Create a Messages request
message = client.messages.create(
    model="google/gemini-3.1-pro-preview",
    max_tokens=1024,
    messages=[
        {
            "role": "user",
            "content": "What is the meaning of life?"
        }
    ]
)

print(message.content[0].text)import Anthropic from "@anthropic-ai/sdk";
// 1. Initialize the Anthropic client
const client = new Anthropic({
// 2. Point the base URL to the ZenMux endpoint
baseURL: "https://zenmux.ai/api/anthropic",
// 3. Replace with the API key from your ZenMux console
apiKey: "<your ZENMUX_API_KEY>",
});
async function main() {
// 4. Create a Messages request
const message = await client.messages.create({
model: "google/gemini-3.1-pro-preview",
max_tokens: 1024,
messages: [
{
role: "user",
content: "What is the meaning of life?",
},
],
});
console.log(message.content[0].text);
}
main();curl https://zenmux.ai/api/anthropic/v1/messages \
-H "content-type: application/json" \
-H "x-api-key: $ZENMUX_API_KEY" \
-H "anthropic-version: 2023-06-01" \
-d '{
"model": "google/gemini-3.1-pro-preview",
"max_tokens": 1024,
"messages": [
{
"role": "user",
"content": "What is the meaning of life?"
}
]
}'Protocol 4: Google Gemini
Compatibility
ZenMux supports the Google Gemini (Vertex AI) protocol, allowing you to call models directly with the Google GenAI SDK.
The base URL is https://zenmux.ai/api/vertex-ai. You need to set vertexai=True and configure custom http_options.
from google import genai
from google.genai import types

# 1. Initialize the Google GenAI client
client = genai.Client(
    # 2. Replace with the API key from your ZenMux console
    api_key="<your ZENMUX_API_KEY>",
    vertexai=True,
    # 3. Point the base URL to the ZenMux endpoint
    http_options=types.HttpOptions(
        api_version='v1',
        base_url='https://zenmux.ai/api/vertex-ai'
    )
)

# 4. Create a generateContent request
response = client.models.generate_content(
    model="google/gemini-3.1-pro-preview",
    contents="What is the meaning of life?"
)

print(response.text)import { GoogleGenAI } from "@google/genai";
// 1. Initialize the Google GenAI client
const ai = new GoogleGenAI({
// 2. Replace with the API key from your ZenMux console
apiKey: "<your ZENMUX_API_KEY>",
vertexai: true,
// 3. Point the base URL to the ZenMux endpoint
httpOptions: {
apiVersion: "v1",
baseUrl: "https://zenmux.ai/api/vertex-ai",
},
});
async function main() {
// 4. Create a generateContent request
const response = await ai.models.generateContent({
model: "google/gemini-3.1-pro-preview",
contents: "What is the meaning of life?",
});
console.log(response.text);
}
main();Platform API
ZenMux provides a set of Platform Management APIs that let you programmatically query account usage, balance, subscription status, and more — making it easy to integrate with your monitoring and management systems.
⚠️ Management API Key
Platform APIs require a Management API Key for authentication (some endpoints also accept a regular API key). Go to ZenMux Console > Management to create a Management API Key.
Query Generation Details
Retrieve detailed information about a specific API call, including token usage, latency, and billing breakdown.
GET https://zenmux.ai/api/v1/management/generation?id=<generation_id>Each API call returns a generation_id. Use that ID to query the full details of the call:
curl https://zenmux.ai/api/v1/management/generation?id=gen_01abc123def456 \
  -H "Authorization: Bearer $ZENMUX_API_KEY"
Example response (partial):
{
  "api": "chat.completions",
  "generationId": "gen_01abc123def456",
  "model": "openai/gpt-4o",
  "generationTime": 3200,
  "latency": 500,
  "nativeTokens": {
    "completion_tokens": 128,
    "prompt_tokens": 32,
    "total_tokens": 160
  },
  "usage": 0.0052
}
💡 Billing Data Delay
Billing information (such as usage and ratingResponses) becomes available 3–5 minutes after the request completes. Token usage metrics are returned synchronously with the request.
📚 Full Documentation
For detailed parameter descriptions, see the Get Generation API docs.
Query PAYG Balance
Retrieve the current Pay As You Go balance for your account.
GET https://zenmux.ai/api/v1/management/payg/balancecurl https://zenmux.ai/api/v1/management/payg/balance \
-H "Authorization: Bearer $ZENMUX_MANAGEMENT_API_KEY"Example response:
{
  "success": true,
  "data": {
    "currency": "usd",
    "total_credits": 482.74,
    "top_up_credits": 35.00,
    "bonus_credits": 447.74
  }
}
📚 Full Documentation
For detailed parameter descriptions, see the Get PAYG Balance API docs.
Query Subscription Details
Retrieve your account's subscription information, including plan tier, Flow rate, and quota usage.
GET https://zenmux.ai/api/v1/management/subscription/detailcurl https://zenmux.ai/api/v1/management/subscription/detail \
-H "Authorization: Bearer $ZENMUX_MANAGEMENT_API_KEY"Example response (partial):
{
  "success": true,
  "data": {
    "plan": {
      "tier": "ultra",
      "amount_usd": 200,
      "interval": "month"
    },
    "account_status": "healthy",
    "quota_5_hour": {
      "max_flows": 800,
      "used_flows": 57.2,
      "remaining_flows": 742.8,
      "usage_percentage": 0.0715
    },
    "quota_7_day": {
      "max_flows": 6182,
      "used_flows": 416.11,
      "remaining_flows": 5765.89
    }
  }
}
📚 Full Documentation
For detailed parameter descriptions, see the Get Subscription Detail API docs.
Query Flow Rate
Retrieve the current Flow rate information for your account.
GET https://zenmux.ai/api/v1/management/flow_ratecurl https://zenmux.ai/api/v1/management/flow_rate \
-H "Authorization: Bearer $ZENMUX_MANAGEMENT_API_KEY"Example response:
{
  "success": true,
  "data": {
    "currency": "usd",
    "base_usd_per_flow": 0.03283,
    "effective_usd_per_flow": 0.03283
  }
}
📚 Full Documentation
For detailed parameter descriptions, see the Get Flow Rate API docs.
Advanced Usage
For more details on advanced usage, refer to the Advanced Usage section.
Contact Us
If you encounter any issues or have suggestions and feedback, feel free to reach out:
- Official Website: https://zenmux.ai
- Technical Support: [email protected]
- Business Inquiries: [email protected]
- Twitter: @ZenMuxAI
- Discord Community: http://discord.gg/vHZZzj84Bm
For more contact options and details, visit our Contact Us page.