Guide to Using Claude Code CLI with ZenMux
Compatibility Notes
Claude Code is Anthropic’s official Coding Agent. With ZenMux integration, you can access a broader set of model options instead of being limited to Anthropic’s official Claude models.
For example, via ZenMux you can use GPT-5.2 series, Claude-4.5 series, Gemini-3 series, Grok 4.1 series, Doubao-Seed-Code, Kimi-K2, Minimax-M2, GLM-4.6, DeepSeek-V3.2, Qwen3-Coder-Plus, and more in Claude Code. For the full list of supported models, see the official model list.
ZenMux fully supports the Anthropic API protocol and can be seamlessly integrated into tools like Claude Code and Cursor. You only need to change two parameters to use it.
Note: the Anthropic-compatible base_url="https://zenmux.ai/api/anthropic".
Configuration Options
Install Claude Code
Important Update: npm/pnpm Installation Is Deprecated
The npm/pnpm installation method for Claude Code has been deprecated and is no longer recommended. If you previously installed Claude Code via npm/pnpm, uninstall the old version first, then use the new native installation method.
Uninstall the old version (if applicable):
# Uninstall the npm/pnpm-installed version
npm uninstall -g @anthropic-ai/claude-code
# or
pnpm uninstall -g @anthropic-ai/claude-code

# If you are already on the native install, you can run the migration command directly
claude install
Recommended installation (native install):
# One-line install script (recommended)
curl -fsSL https://claude.ai/install.sh | bash# PowerShell install script
irm https://claude.ai/install.ps1 | iex# CMD install script
curl -fsSL https://claude.ai/install.cmd -o install.cmd && install.cmd && del install.cmd# Install with Homebrew
brew install --cask claude-code
# Note: Homebrew installs do not auto-update; updates must be run manually
# Update command: brew upgrade claude-code# Install with WinGet
winget install Anthropic.ClaudeCode
# Note: WinGet installs do not auto-update; updates must be run manually
# Update command: winget upgrade Anthropic.ClaudeCode💡 Installation Notes
- Native install (recommended): The script-based installers for macOS/Linux/WSL and Windows auto-update so you always stay on the latest version.
- Package manager install: Homebrew and WinGet require you to run the update command manually to get new versions.
- Full installation docs: For detailed install options, system requirements, auth methods, and more, see the official Claude Code installation docs.
- Verify installation: After installation, run
claude doctorto check the installation status.
Configure Claude Code
How the Configuration Works
By default, Claude Code connects directly to Anthropic’s official service. However, by configuring environment variables, we can redirect its requests to ZenMux. This provides several benefits:
- No changes to Claude Code itself: Switch endpoints using only environment variables
- Authenticate with a ZenMux API Key: Replaces Anthropic’s official API key
- More model choices: In addition to Claude, you can use GPT, Gemini, Qwen, and more
The core configuration is to set two key environment variables: ANTHROPIC_BASE_URL (the ZenMux endpoint) and ANTHROPIC_AUTH_TOKEN (your ZenMux API Key), so that all Claude Code requests are proxied through ZenMux.
Important Change in v2.0.7x
Due to updates in Claude Code v2.0.7x, its environment-variable loading logic has changed: the env config in ~/.claude/settings.json cannot be reliably read in the following scenarios:
- When logging in for the first time in Claude Code
- When logging in again after running logout
Therefore, when connecting to ZenMux, it’s recommended to standardize on shell profile environment variables to ensure both login and requests go through ZenMux’s Anthropic-compatible endpoint.
Step 0: Get a ZenMux API Key
Before configuring Claude Code, you need a ZenMux API Key. ZenMux offers two billing options—choose based on your use case:
✅ Best for: personal development, learning/exploration, Vibe Coding
✅ Features: fixed monthly fee, predictable cost, 5–10x price leverage
✅ API Key format: sk-ss-v1-xxx

How to get it:
1. Visit the subscription management page: https://zenmux.ai/platform/subscription
2. Choose a plan (Pro $20/mo, Max $100/mo, Ultra $200/mo)
3. After subscribing, create a subscription API Key on the page

For details, see: Subscription Plan Guide
📚 https://docs.zenmux.ai/guide/subscription✅ Best for: production, commercial products, enterprise applications
✅ Features: no rate limits, production-grade stability, billed by actual usage
✅ API Key format: sk-ai-v1-xxx
How to get it:
1. Visit the pay-as-you-go page: https://zenmux.ai/platform/pay-as-you-go
2. Top up your account (top-ups automatically include a 20% bonus credit)
3. Create an API Key in the "Pay As You Go API Keys" section
For details, see: Pay-as-you-go Guide
📚 https://docs.zenmux.ai/guide/pay-as-you-go💡 Important: Choose the Right API Key Type
- Personal development / learning → Use a Subscription API Key (
sk-ss-v1-xxx) for lower, better value cost - Production / commercial projects → Use a Pay-as-you-go API Key (
sk-ai-v1-xxx) for higher stability and no limits
Subscription keys are not allowed for production use. Violations may result in account restrictions.
Step 1: Configure Shell Environment Variables (Recommended)
This step writes the ZenMux connection configuration into your shell config file so it automatically applies whenever you open a terminal.
# ============== Steps ==============

# 1. Determine which shell you are using (usually bash or zsh):
#    - If using bash, edit ~/.bashrc
#    - If using zsh, edit ~/.zshrc
#    - If you're not sure, run echo $SHELL

# 2. Append the following to the end of the corresponding config file (replace the API Key)

# ============= ZenMux + Claude Code Configuration =============
# Connect Claude Code to ZenMux instead of Anthropic’s official service

# Core settings: ZenMux endpoint and authentication
export ANTHROPIC_BASE_URL="https://zenmux.ai/api/anthropic"  # ZenMux Anthropic-compatible endpoint
export ANTHROPIC_AUTH_TOKEN="sk-ss-v1-xxx"                   # Replace with your ZenMux API Key (subscription sk-ss-v1-xxx or pay-as-you-go sk-ai-v1-xxx)
# Avoid conflicts: if you previously set ANTHROPIC_API_KEY locally, explicitly clear it
export ANTHROPIC_API_KEY=""

# Optional tweaks
export CLAUDE_CODE_DISABLE_NONESSENTIAL_TRAFFIC="1"          # Disable non-essential telemetry
export API_TIMEOUT_MS="30000000"                              # API request timeout (milliseconds)

# Note: The three core variables above are sufficient. If you do NOT set the model variables,
#       Claude Code will use its built-in defaults (the official Anthropic Claude series).
#       See the "Switch / Set Default Models" section below if you want to customize.

# 3. Apply the configuration (choose one):
# Option 1: Reload the config file (recommended)
source ~/.bashrc  # if using bash
# or
source ~/.zshrc   # if using zsh

# Option 2: Restart the terminal window# ============== Steps ==============
# On Windows, use the PowerShell Profile to configure environment variables
# PowerShell 7+ is recommended for a better experience
# 1. Check whether the PowerShell Profile exists
Test-Path $PROFILE
# 2. If it returns False, create the Profile file
if (!(Test-Path $PROFILE)) {
New-Item -Path $PROFILE -ItemType File -Force
}
# 3. Open the Profile file for editing
notepad $PROFILE
# If you use VSCode, you can also run: code $PROFILE
# 4. Append the following to the end of the Profile file (replace the API Key)
# ============= ZenMux + Claude Code Configuration =============
# Connect Claude Code to ZenMux instead of Anthropic’s official service
# Core settings: ZenMux endpoint and authentication
$env:ANTHROPIC_BASE_URL = "https://zenmux.ai/api/anthropic" # ZenMux Anthropic-compatible endpoint
$env:ANTHROPIC_AUTH_TOKEN = "sk-ss-v1-xxx" # Replace with your ZenMux API Key (subscription sk-ss-v1-xxx or pay-as-you-go sk-ai-v1-xxx)
# Avoid conflicts: if you previously set ANTHROPIC_API_KEY locally, explicitly clear it
$env:ANTHROPIC_API_KEY = ""
# Optional tweaks
$env:CLAUDE_CODE_DISABLE_NONESSENTIAL_TRAFFIC = "1" # Disable non-essential telemetry
$env:API_TIMEOUT_MS = "30000000" # API request timeout (milliseconds)
# Note: The three core variables above are sufficient. If you do NOT set the model variables,
# Claude Code will use its built-in defaults (the official Anthropic Claude series).
# See the "Switch / Set Default Models" section below if you want to customize.
# 5. Save the file, then restart PowerShell to apply
# Or run this in the current window: . $PROFILE
# 6. Verify the environment variables were set successfully
Write-Host "ANTHROPIC_BASE_URL: $env:ANTHROPIC_BASE_URL"
Write-Host "ANTHROPIC_AUTH_TOKEN: $env:ANTHROPIC_AUTH_TOKEN"🔑 Important: Replace the API Key
Be sure to replace sk-ss-v1-xxx or sk-ai-v1-xxx in the configuration with your real ZenMux API Key:
Subscription API Key (recommended for personal development)
- Format:
sk-ss-v1-xxx - Get it from: Subscription management page
- Detailed guide: Subscription plan docs
Pay-as-you-go API Key (production)
- Format:
sk-ai-v1-xxx - Get it from: Pay-as-you-go page
- Detailed guide: Pay-as-you-go docs
📋 Environment Variable Reference
| Variable | Required | Purpose | Notes |
|---|---|---|---|
ANTHROPIC_BASE_URL | ✅ | Service endpoint | Redirects Claude Code requests to ZenMux |
ANTHROPIC_AUTH_TOKEN | ✅ | Auth token | Your ZenMux API Key (subscription or pay-as-you-go) |
ANTHROPIC_API_KEY | ✅ | Conflict avoidance | Clear to "" to avoid conflicts with an existing local Anthropic config |
CLAUDE_CODE_DISABLE_NONESSENTIAL_TRAFFIC | Traffic control | Disables non-essential telemetry to improve privacy | |
API_TIMEOUT_MS | API timeout | Sets the API request timeout in milliseconds | |
ANTHROPIC_DEFAULT_*_MODEL | Model mapping | Maps Haiku/Sonnet/Opus tiers. Leave unset to use Claude Code's built-in Claude defaults |
Step 2: Launch Claude Code and Complete Authentication
After the environment variables are configured, you can start Claude Code. On first launch, it will automatically authenticate via ZenMux.
Steps:
Open a new terminal window (to ensure the environment variables are loaded)
Go to your project directory:
bashcd /path/to/your/projectStart Claude Code:
bashclaudeOn first launch, Claude Code will:
- Automatically read
ANTHROPIC_AUTH_TOKENfrom your environment variables - Authenticate via the ZenMux endpoint specified by
ANTHROPIC_BASE_URL - Start working immediately, with no additional login steps
- Automatically read
Tip
If you see an error that the claude command cannot be found, confirm that Claude Code is installed globally (see the installation steps above).
Step 3: Verify the Connection
After launching successfully, it’s recommended to verify that Claude Code is correctly connected to ZenMux.
In the Claude Code prompt, run /status and check whether the configuration is correct:
> /status
Auth token: ANTHROPIC_AUTH_TOKEN  # [!code highlight]
Anthropic base URL: https://zenmux.ai/api/anthropic  # [!code highlight]
What to verify:
- ✅
Auth tokenshould displayANTHROPIC_AUTH_TOKEN(meaning it’s read from environment variables) - ✅
Anthropic base URLshould displayhttps://zenmux.ai/api/anthropic(the ZenMux endpoint)
If everything matches, your setup is complete—you can now use Claude Code through ZenMux.
Switch / Set Default Models
Configuring default models is optional. If you leave ANTHROPIC_DEFAULT_*_MODEL unset, Claude Code falls back to its built-in defaults — the official Anthropic Claude series.
Using Official Claude Models (Recommended: Aliases)
For official Claude models, use the Claude model alias format — e.g., claude-opus-4-7, claude-sonnet-4-6, claude-haiku-4-5 — rather than the full ZenMux id (anthropic/claude-sonnet-4.6).
# ✅ Recommended: aliases unlock all Claude Code features (1M context, effort control, etc.)
export ANTHROPIC_DEFAULT_HAIKU_MODEL="claude-haiku-4-5"    # Fast tier
export ANTHROPIC_DEFAULT_SONNET_MODEL="claude-sonnet-4-6"  # Balanced tier
export ANTHROPIC_DEFAULT_OPUS_MODEL="claude-opus-4-7"      # Most capable tier
💡 Why use aliases?
Claude Code validates model names against hardcoded strings to enable features like the 1M context window and reasoning effort control. When the validator sees claude-sonnet-4-6, the feature activates; when it sees anthropic/claude-sonnet-4.6, the check fails and the feature silently turns off.
ZenMux's model alias feature makes claude-sonnet-4-6 fully equivalent to anthropic/claude-sonnet-4.6, so Claude Code's checks pass and every downstream feature works as designed. See Model Aliases for the full list and more details.
Using Non-Claude Models
When pointing Claude Code at a non-Claude model (e.g., GPT, Gemini, Doubao), you must use the full ZenMux model id — aliases only cover the native Claude family:
export ANTHROPIC_DEFAULT_HAIKU_MODEL="volcengine/doubao-seed-code"
export ANTHROPIC_DEFAULT_SONNET_MODEL="openai/gpt-5.2"
export ANTHROPIC_DEFAULT_OPUS_MODEL="google/gemini-3-pro-preview"
After editing, remember to run source ~/.bashrc / source ~/.zshrc or restart the terminal for changes to take effect.
Supported Models
Notes on Models Supported by the Anthropic Protocol
Models compatible with the Anthropic protocol are being adapted in batches. You can filter currently supported models via the official model list and select the Anthropic Messages protocol: 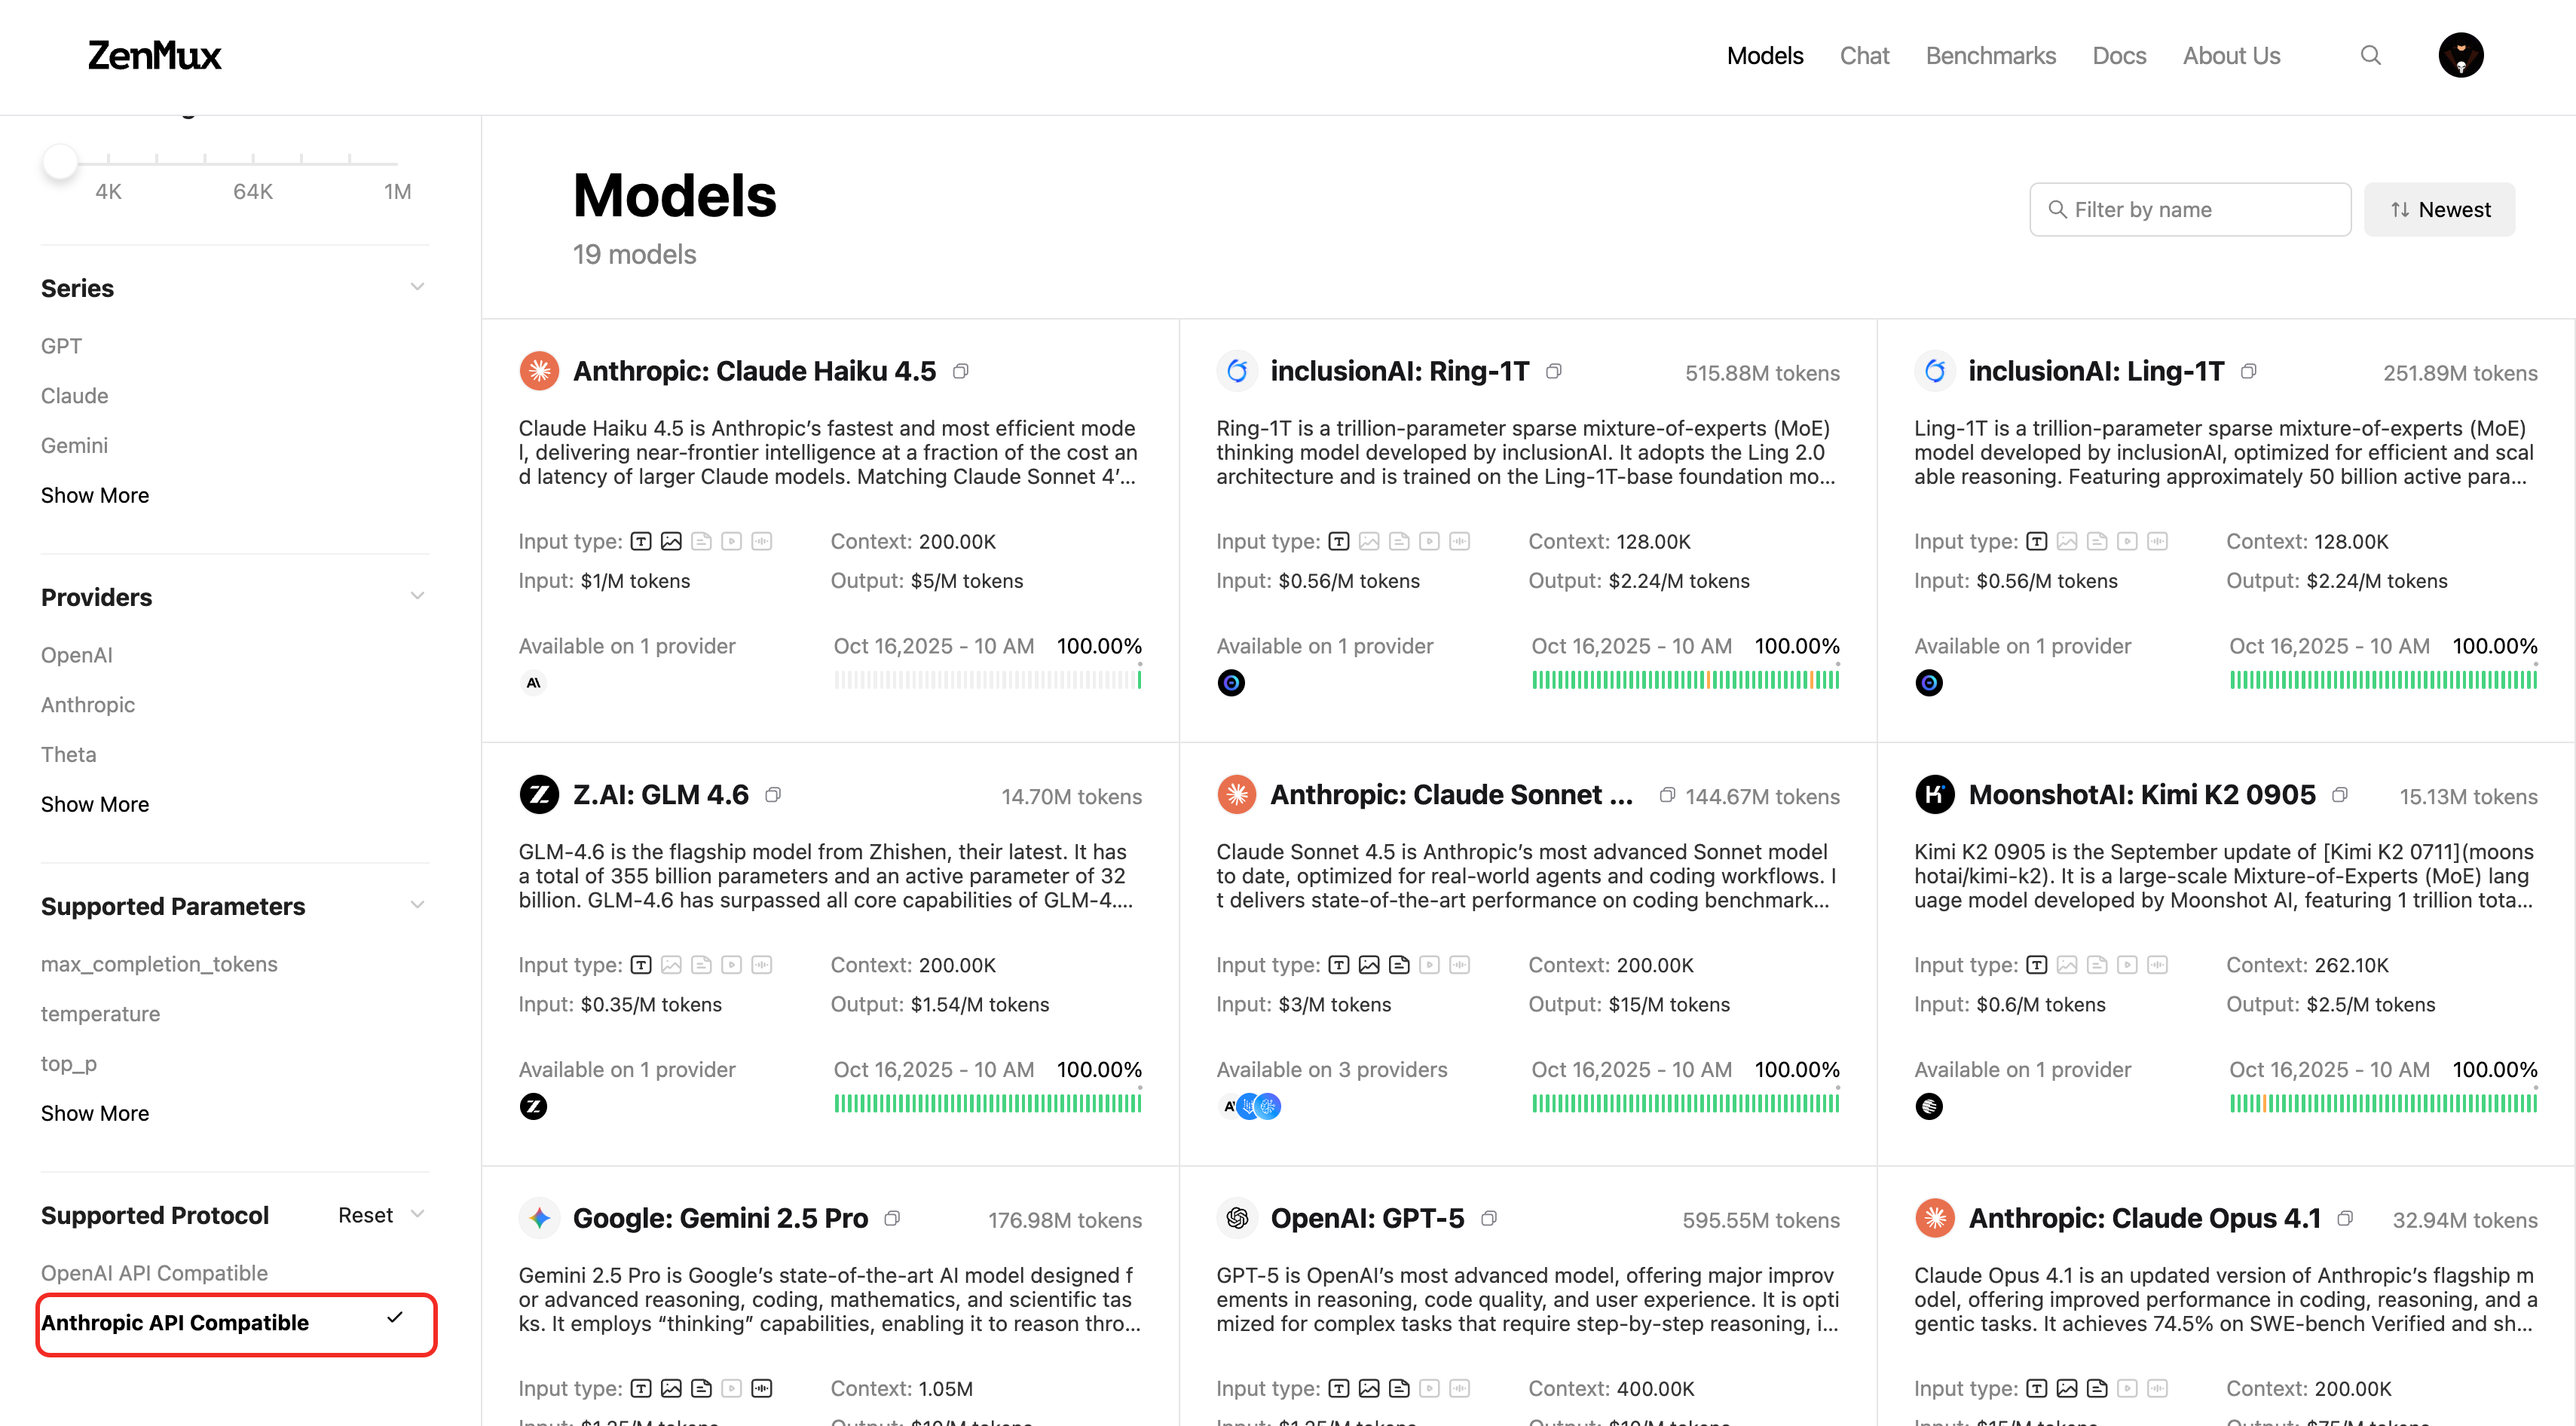 Or you can check support on a specific model detail page:
Use the Claude Code Extension in VSCode
In addition to the CLI, Claude Code also provides a VSCode extension, allowing you to use Claude Code directly inside the VSCode editor for AI-assisted programming.
Step 1: Install the Claude Code Extension
Search for and install Claude Code Extension from the VSCode Marketplace:
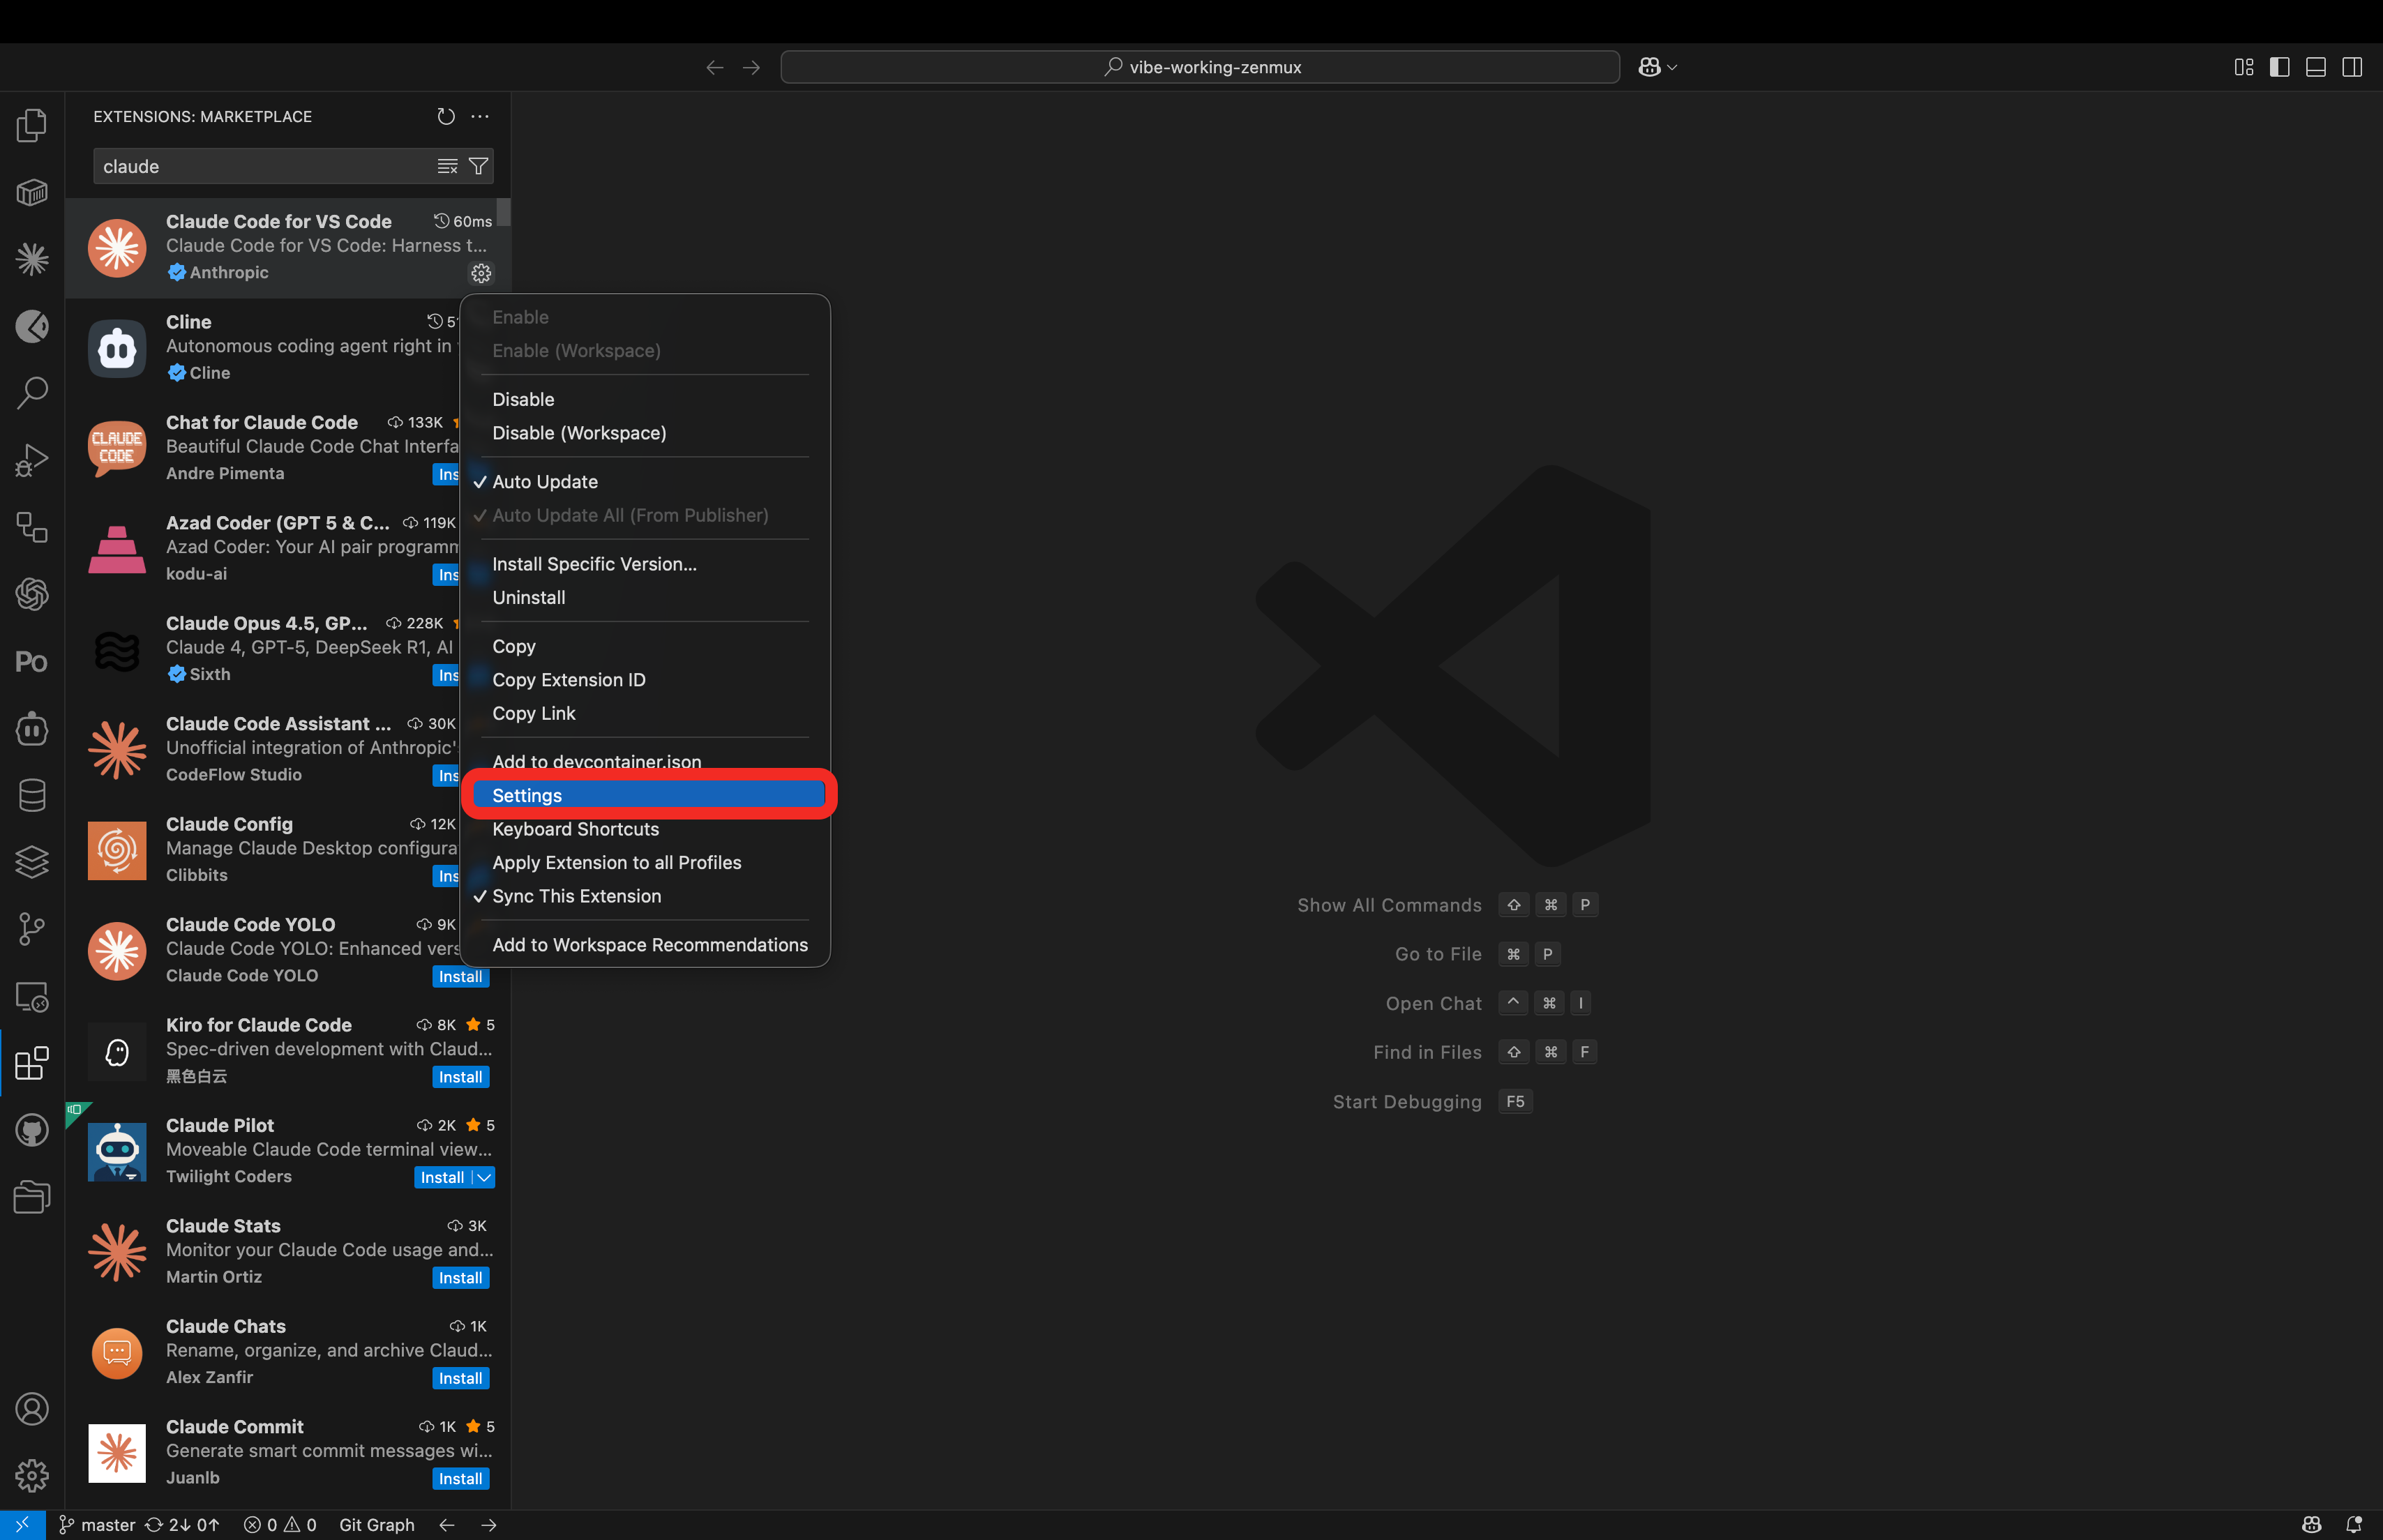
Step 2: Open Settings
After installation, click the extension’s Settings icon to open the configuration page:
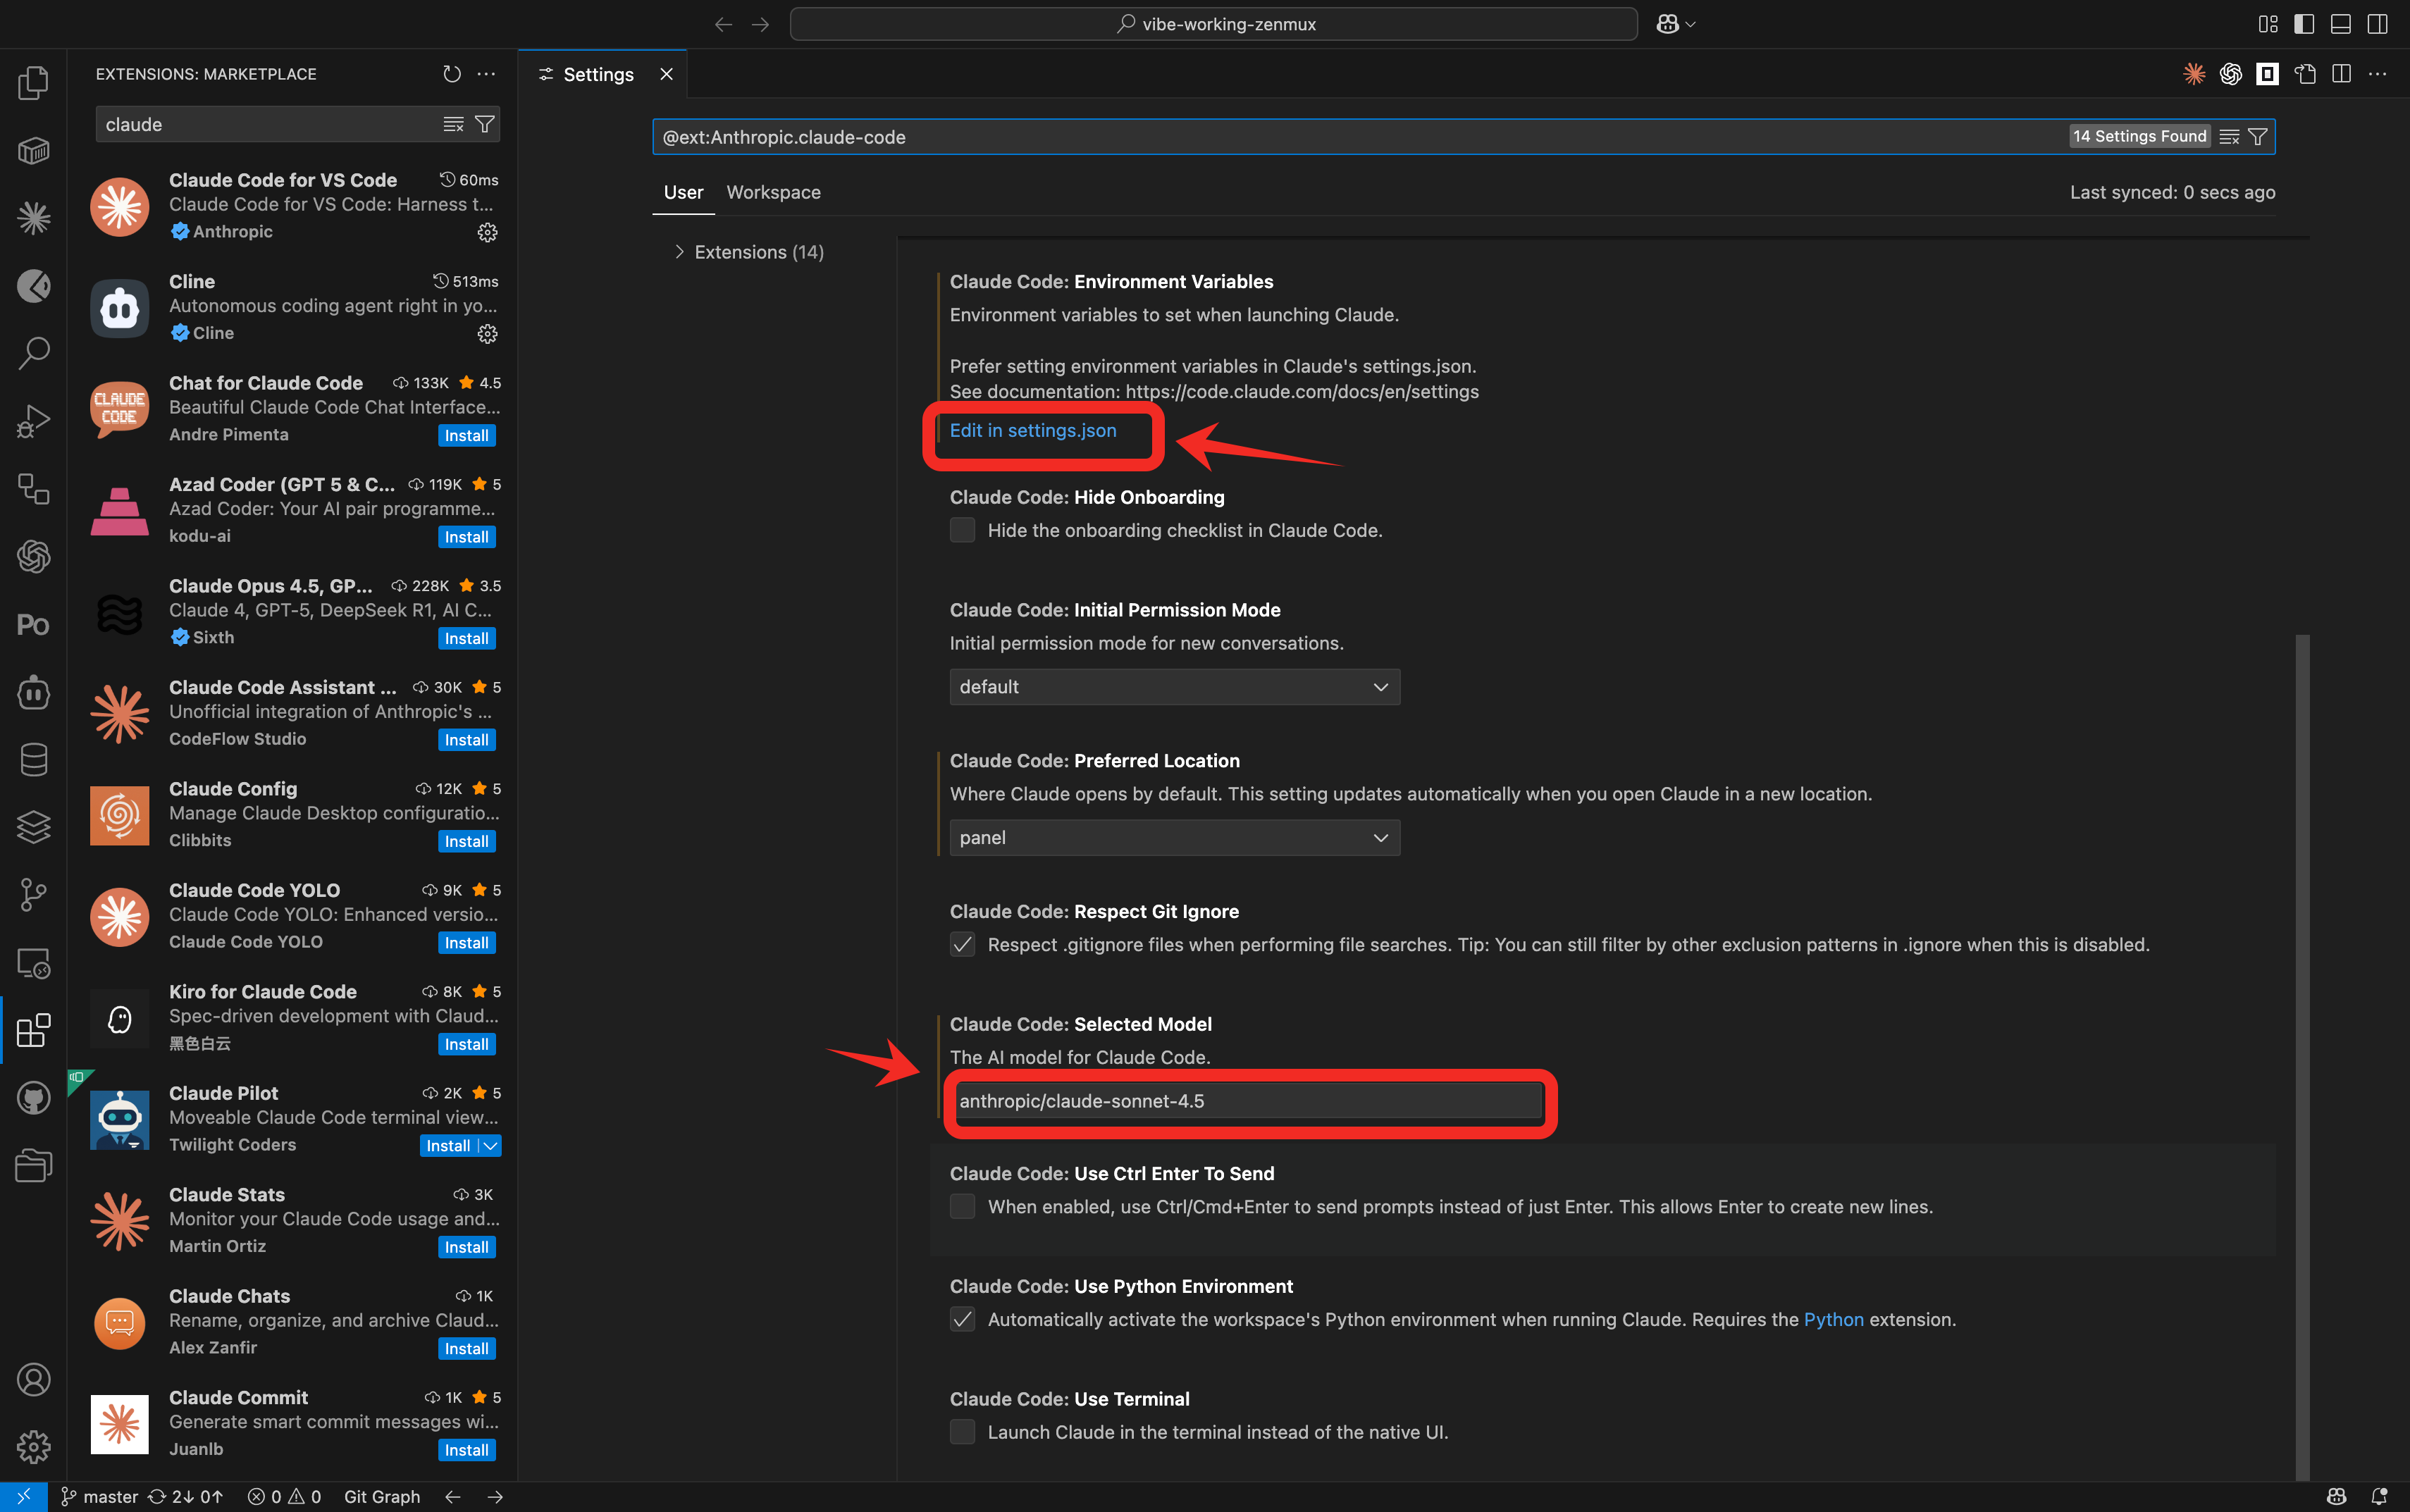
Step 3: Configure the Model and Environment Variables
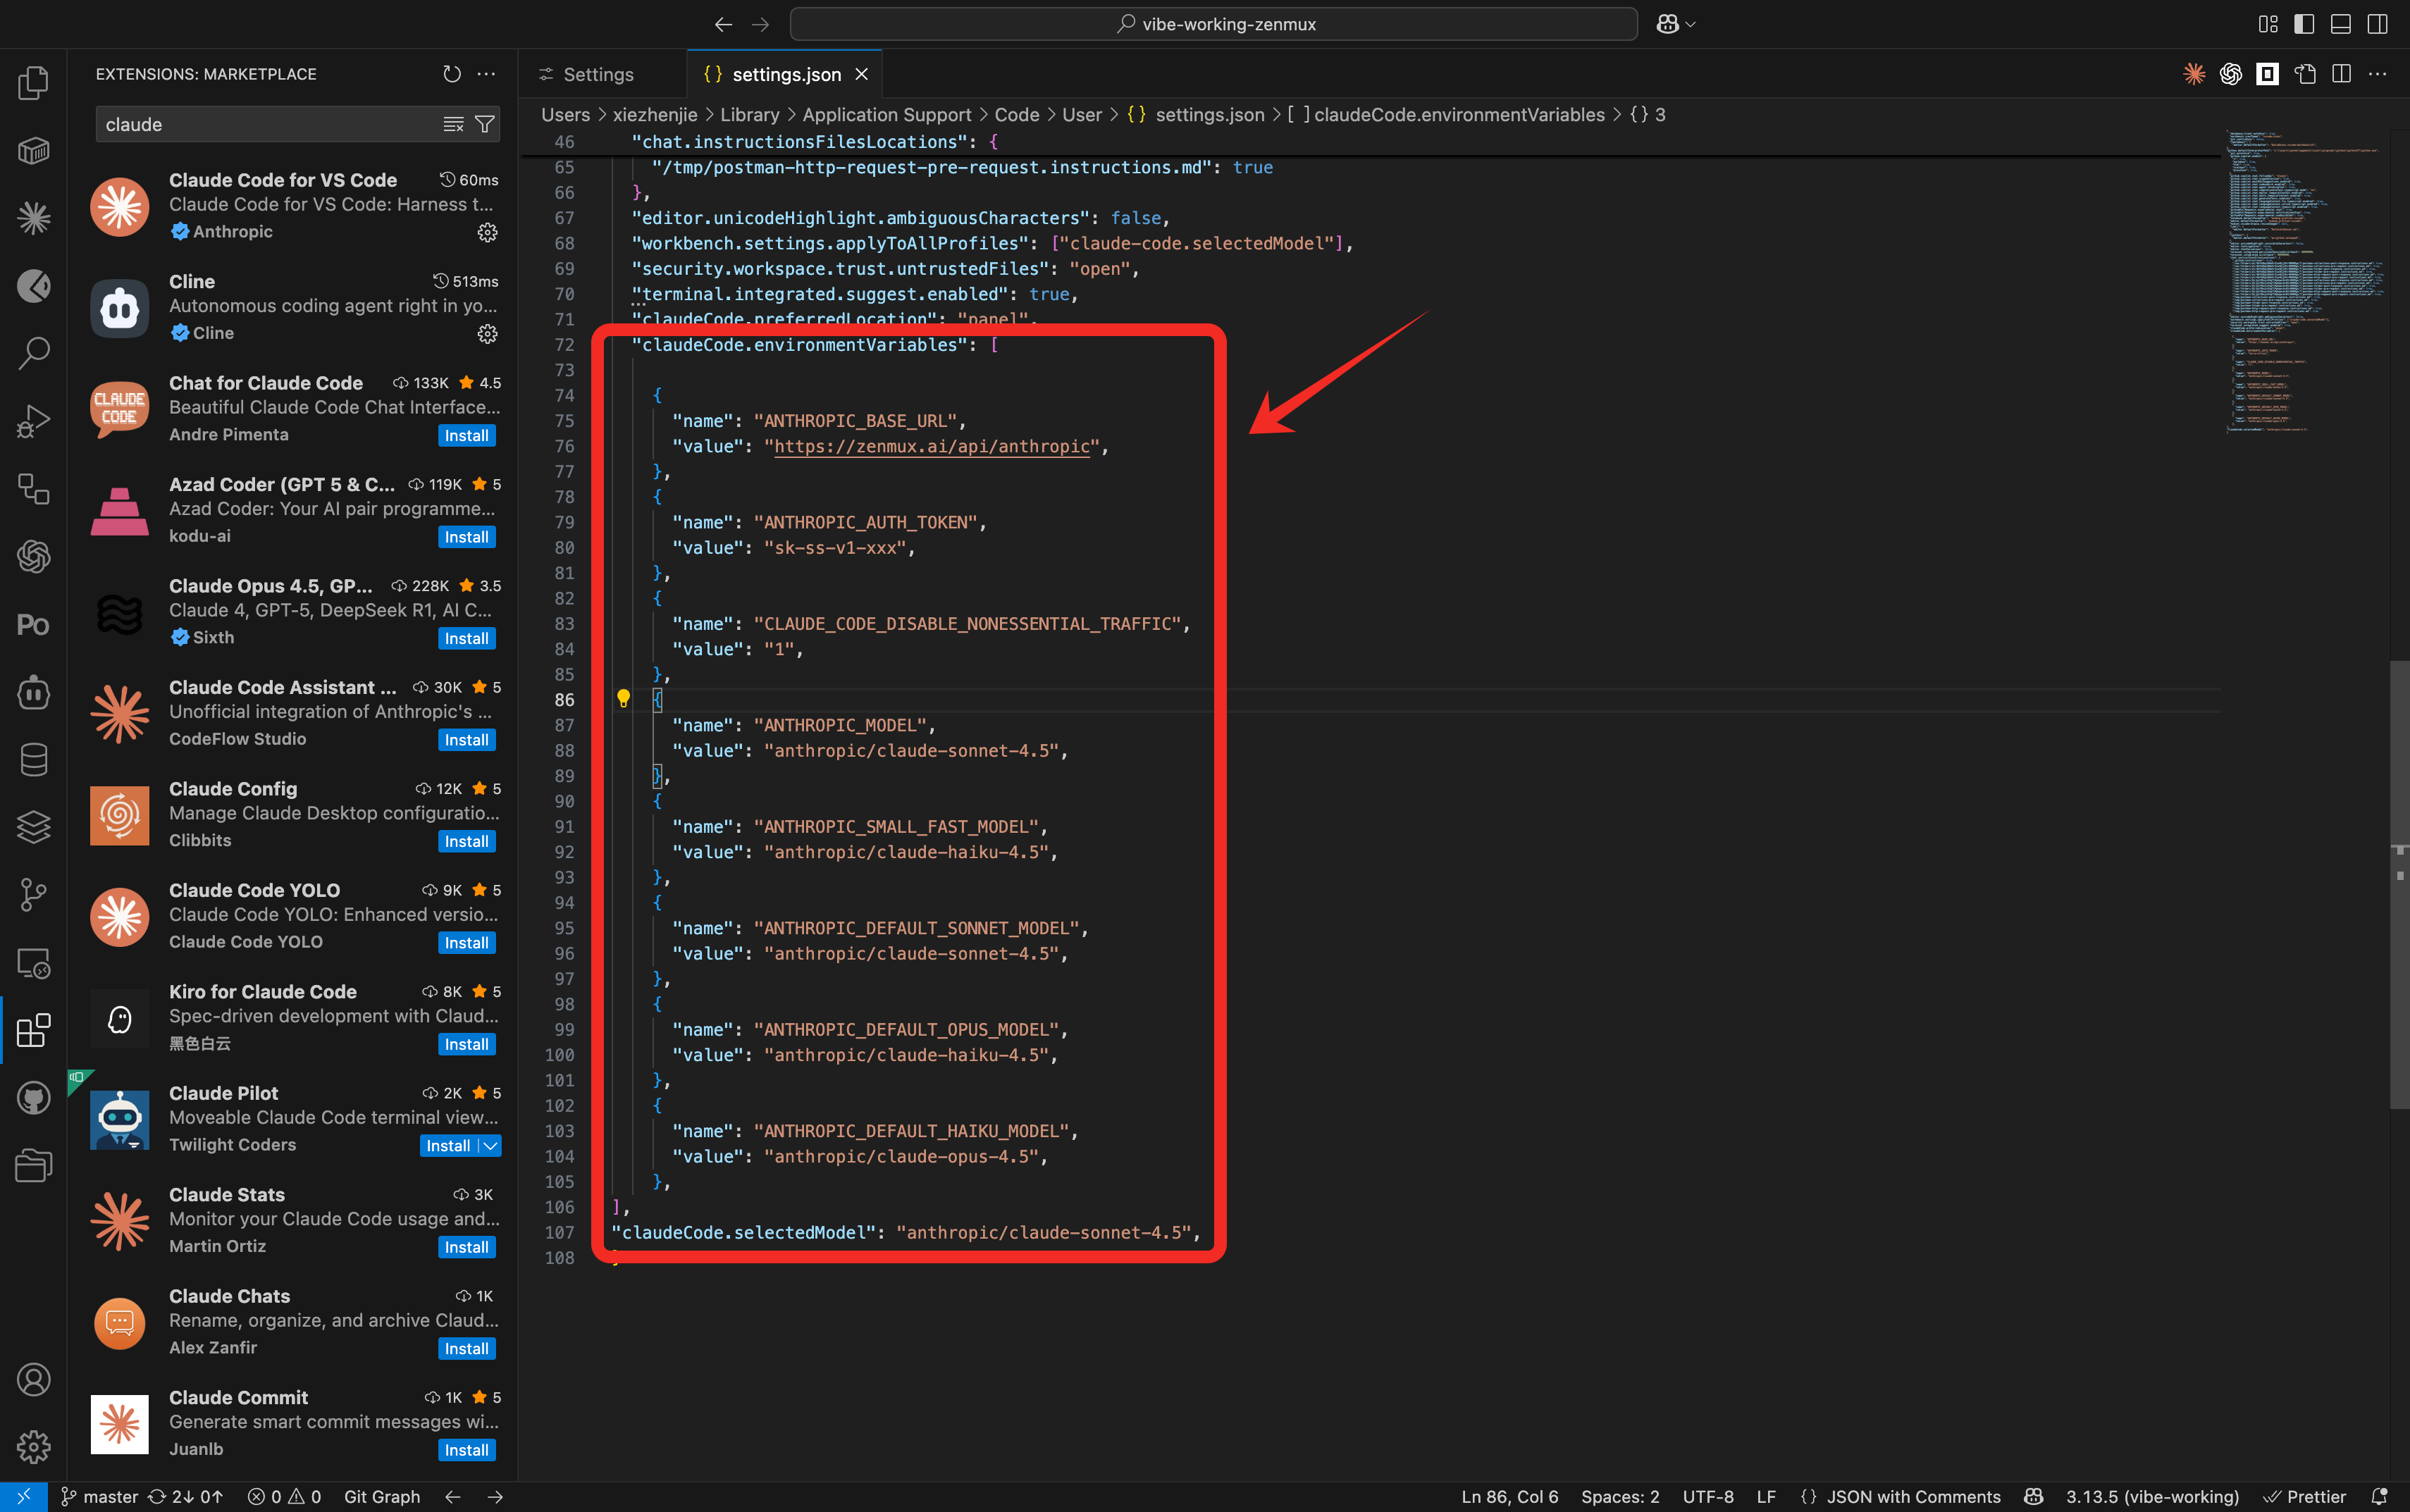
Click Edit in settings.json, then add or modify the following configuration:
{
  // Optional: picks the model shown in the editor UI. Omit to use Claude Code's default.
  // For official Claude models, prefer aliases (e.g., "claude-sonnet-4-6") so that Claude Code
  // features such as the 1M context window and effort control stay enabled.
  "claudeCode.selectedModel": "claude-sonnet-4-6",
  "claudeCode.environmentVariables": [
    {
      "name": "ANTHROPIC_BASE_URL",
      "value": "https://zenmux.ai/api/anthropic"
    },
    {
      "name": "ANTHROPIC_AUTH_TOKEN",
      "value": "sk-ss-v1-xxx"
    },
    {
      "name": "API_TIMEOUT_MS",
      "value": "3000000"
    },
    {
      "name": "CLAUDE_CODE_DISABLE_NONESSENTIAL_TRAFFIC",
      "value": "1"
    }
    // Note: ANTHROPIC_DEFAULT_*_MODEL is optional. Leave unset to use Claude Code's built-in
    // Claude defaults. To customize, add them here using Claude aliases for official Claude
    // models (claude-haiku-4-5 / claude-sonnet-4-6 / claude-opus-4-7). See the Model Alias
    // guide: /guide/advanced/model-alias
  ]
}
🔑 Important Configuration Notes
Replace the API Key: Replace
sk-ss-v1-xxxwith your real ZenMux API Key- Subscription API Key (
sk-ss-v1-xxx): best for personal development - Pay-as-you-go API Key (
sk-ai-v1-xxx): best for production
- Subscription API Key (
Configuration priority:
- If you previously configured shell environment variables in the CLI (
~/.bashrc/~/.zshrc/ PowerShell Profile), the VSCode extension will prefer thesettings.jsonconfiguration - To avoid conflicts, when using the VSCode extension, configure environment variables only in
settings.json
- If you previously configured shell environment variables in the CLI (
Model selection:
claudeCode.selectedModelsets the model currently in useANTHROPIC_DEFAULT_*_MODELsets the default models for the three speed tiers- You can switch models during a session using the
/modelcommand
Step 4: Start Using It
After configuration, you can use the Claude Code extension in VSCode:
- Click the Claude Code icon in the VSCode sidebar
- Enter your question or task in the chat panel
- Claude will automatically read project files and help you
💡 Usage Tips
- Trust the workspace: On first use, Claude Code will ask you to trust the current workspace—click Trust This Folder to allow access to project files.
- Switch models: Type
/modelduring a conversation to view the current model or switch to another. - Check status: Type
/statusto see the current connection status and configuration. - Environment variable conflicts: If you run into auth issues, confirm
ANTHROPIC_AUTH_TOKENandANTHROPIC_BASE_URLare not being overridden by system-level environment variables.
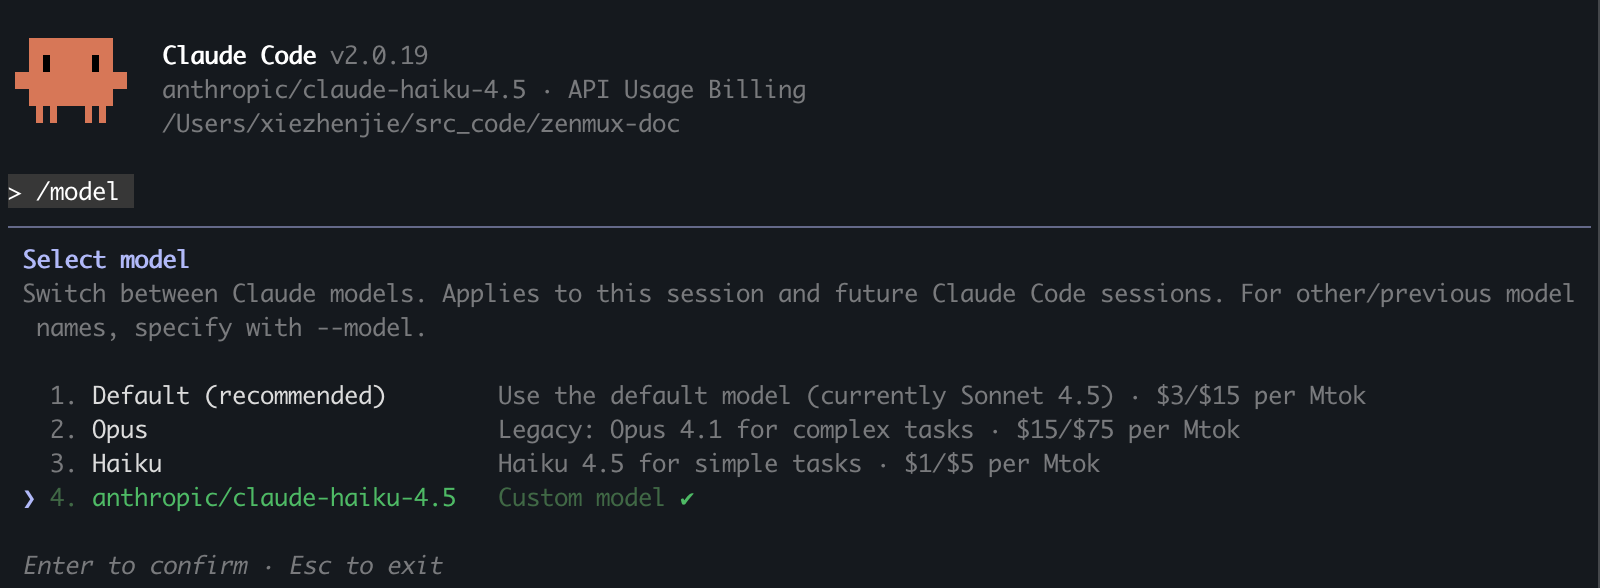
What It Looks Like
After setup, you can use multiple ZenMux models in Claude Code:

You can use the '/model' command to confirm which model is currently in use:
Troubleshooting
Common Issues
API Key Error or Authentication Failure
Issue: You see messages like “invalid API key,” “unauthorized,” or authentication failed.
Solution:
Check the API Key format:
- Subscription API keys should start with
sk-ss-v1- - Pay-as-you-go API keys should start with
sk-ai-v1- - Ensure there are no extra spaces or newline characters
- Subscription API keys should start with
Validate the API Key:
- Subscription: visit the subscription management page to check subscription status and quota
- Pay-as-you-go: visit the pay-as-you-go page to confirm sufficient balance
Confirm environment variables are loaded:
bash# macOS/Linux echo $ANTHROPIC_AUTH_TOKEN # Windows PowerShell echo $env:ANTHROPIC_AUTH_TOKENIf the output is empty, the environment variables were not loaded correctly. Re-run
source ~/.zshrcor restart the terminal.Check the API Key status:
- Confirm the API key is shown as "Enabled" in the console
- Check whether the API key has been deleted or disabled
Get a new API Key:
Authentication Failure When Switching from Another Platform to ZenMux
Issue: You previously used a Claude Code official account or another platform (e.g., MiniMax, GLM, etc.). After switching to ZenMux, authentication fails or configuration conflicts occur.
Solution:
This usually happens because old config files cached prior authentication info, causing conflicts with the new ZenMux configuration. Clean up and reconfigure as follows:
Delete the old config file:
bash# Delete Claude Code config rm -rf ~/.claude/settings.jsonpowershell# Delete Claude Code config Remove-Item -Path "$env:USERPROFILE\.claude\settings.json" -ForceConfirm your shell environment variables are configured correctly:
Check whether your shell config file (
~/.zshrcor~/.bashrc) contains the full ZenMux configuration. Refer to the Step 1: Configure Shell Environment Variables section above, and ensure it includes these key variables:bashexport ANTHROPIC_BASE_URL="https://zenmux.ai/api/anthropic" export ANTHROPIC_AUTH_TOKEN="sk-ss-v1-xxx" # Replace with your ZenMux API Key export ANTHROPIC_API_KEY="" # Clear to avoid conflicts export CLAUDE_CODE_DISABLE_NONESSENTIAL_TRAFFIC="1" export API_TIMEOUT_MS="30000000" # ANTHROPIC_DEFAULT_*_MODEL is optional — unset means "use Claude Code's built-in Claude defaults". # To customize Claude models, prefer aliases so features like 1M context stay enabled. See: # /guide/advanced/model-aliasReload environment variables:
bashsource ~/.zshrcbashsource ~/.bashrcpowershell. $PROFILEVerify environment variables are applied:
bash# Check ZenMux endpoint echo $ANTHROPIC_BASE_URL # Should output: https://zenmux.ai/api/anthropic # Check whether the API Key is set echo $ANTHROPIC_AUTH_TOKEN # Should output your ZenMux API Key # Confirm the old API Key is cleared echo $ANTHROPIC_API_KEY # Should output emptypowershell# Check ZenMux endpoint Write-Host "ANTHROPIC_BASE_URL: $env:ANTHROPIC_BASE_URL" # Should output: https://zenmux.ai/api/anthropic # Check whether the API Key is set Write-Host "ANTHROPIC_AUTH_TOKEN: $env:ANTHROPIC_AUTH_TOKEN" # Should output your ZenMux API Key # Confirm the old API Key is cleared Write-Host "ANTHROPIC_API_KEY: $env:ANTHROPIC_API_KEY" # Should output emptyRestart Claude Code:
bash# Enter your project directory cd /path/to/your/project # Start Claude Code claudeVerify the connection:
After starting, run
/statusin Claude Code and confirm it shows:textAuth token: ANTHROPIC_AUTH_TOKEN Anthropic base URL: https://zenmux.ai/api/anthropic
The Model Does Not Support the Anthropic Protocol
Issue: When using a model, you see a message saying it does not support the Anthropic protocol.
Solution:
- Use the ZenMux model list and filter by "Anthropic API Compatible" to see currently supported models
- Or open the model’s detail page to confirm Anthropic protocol support
- Choose a model from the supported list above
Connection Failures
Issue: Claude Code cannot connect to the ZenMux service.
Solution:
- Check that your network connection is working
- Verify
ANTHROPIC_BASE_URLis set tohttps://zenmux.ai/api/anthropic - Confirm your firewall is not blocking outbound connections
VSCode Claude Code Extension Configuration Issues
Issue: In the VSCode Claude Code extension, you encounter issues such as authentication failures or models not working.
Solution:
Confirm the environment variables are configured correctly:
- Open VSCode Settings (
Cmd/Ctrl + ,) - Search for "Claude Code"
- Click "Edit in settings.json"
- Confirm
claudeCode.environmentVariablesincludes correctANTHROPIC_BASE_URLandANTHROPIC_AUTH_TOKEN
- Open VSCode Settings (
Check the model configuration:
- Search for "claude-code.selectedModel" in Settings
- Confirm the model name format is correct (e.g.,
anthropic/claude-sonnet-4.5) - Confirm the model supports the Anthropic protocol (check via the model list)
Resolve environment variable conflicts:
- The VSCode extension’s
settings.jsonconfiguration has higher priority than system environment variables - If you previously set environment variables in your shell profile, it’s recommended to keep only one source of configuration
- Avoid setting
ANTHROPIC_AUTH_TOKENin multiple places, which can cause conflicts
- The VSCode extension’s
Restart VSCode:
- After changing configuration, fully quit and relaunch VSCode
- Reopen the project so the new configuration takes effect
Check extension logs:
- Open the Output panel in VSCode (
View > Output) - Select the "Claude Code" channel
- Review detailed error messages to help diagnose the issue
- Open the Output panel in VSCode (
Verify the connection:
- In the Claude Code chat UI, type
/status - Confirm the displayed API endpoint and authentication method are correct
- In the Claude Code chat UI, type
For detailed configuration steps, see the Use the Claude Code Extension in VSCode section above.
Windows PowerShell Script Execution Policy Issue
Issue: PowerShell shows: “Cannot load file xxx because running scripts is disabled on this system.”
Solution:
This is a Windows PowerShell security mechanism. You need to change the execution policy:
Run PowerShell as Administrator
Execute:
powershellSet-ExecutionPolicy -ExecutionPolicy RemoteSigned -Scope CurrentUserType
Yto confirmReopen the PowerShell window
Execution policy reference:
Restricted(default): no scripts can runRemoteSigned: local scripts can run; downloaded scripts require a digital signatureUnrestricted: all scripts can run (not recommended)
Windows: claude Command Not Found
Issue: After installing Claude Code, PowerShell cannot find the claude command.
Solution:
This is usually caused by the npm global package path not being added to the PATH environment variable.
Check the npm global prefix:
powershellnpm config get prefixCheck whether that path is in PATH:
powershell$env:PATH -split ";" | Select-String "npm"If it isn’t, add it manually (choose one):
Option 1: Temporary (current session only)
powershell$env:PATH += ";C:\Users\<YourUsername>\AppData\Roaming\npm"Option 2: Permanent (recommended)
powershell[Environment]::SetEnvironmentVariable( "Path", [Environment]::GetEnvironmentVariable("Path", "User") + ";C:\Users\<YourUsername>\AppData\Roaming\npm", "User" )Close and reopen PowerShell
Verify the installation:
powershellclaude --version
Windows PowerShell Profile Not Taking Effect
Issue: You configured the PowerShell Profile, but the environment variables are not loaded.
Solution:
Confirm the Profile file path is correct:
powershell$PROFILE # Should show something like: C:\Users\<YourUsername>\Documents\PowerShell\Microsoft.PowerShell_profile.ps1Confirm the Profile file exists:
powershellTest-Path $PROFILE # Should return TrueConfirm the Profile file content is correct:
powershellGet-Content $PROFILEManually load the Profile (to test for syntax errors):
powershell. $PROFILEIf errors occur, check:
- Whether the file encoding is UTF-8
- Whether the PowerShell syntax is correct (note the
$env:prefix) - Whether the execution policy allows scripts (see "PowerShell Script Execution Policy Issue" above)
Verify environment variables are loaded:
powershellWrite-Host "ANTHROPIC_BASE_URL: $env:ANTHROPIC_BASE_URL" Write-Host "ANTHROPIC_AUTH_TOKEN: $env:ANTHROPIC_AUTH_TOKEN"
How to Enable the 1M Context Window (and Other Claude Code Features)
Issue: Features like the 1M context window or reasoning effort control are not enabled when using model ids such as anthropic/claude-opus-4.6 or anthropic/claude-sonnet-4.6.
Cause: Claude Code validates the model name against hardcoded strings to decide whether to enable these features. Ids prefixed with anthropic/ do not match, so the feature silently falls back to the default behavior.
Solution: Use the Claude model alias form instead — aliases are exactly the strings Claude Code expects:
# ❌ 1M context window NOT enabled (full ZenMux id)
export ANTHROPIC_DEFAULT_SONNET_MODEL="anthropic/claude-sonnet-4.6"
export ANTHROPIC_DEFAULT_OPUS_MODEL="anthropic/claude-opus-4.6"

# ✅ 1M context window enabled (alias form)
export ANTHROPIC_DEFAULT_SONNET_MODEL="claude-sonnet-4-6"
export ANTHROPIC_DEFAULT_OPUS_MODEL="claude-opus-4-6"
After making the change, reload your config with source ~/.zshrc or source ~/.bashrc, then restart Claude Code.
For the full list of supported aliases and more background, see the Model Aliases guide.
Cannot Use Opus 4.7 Correctly
Issue: After pointing Claude Code at claude-opus-4-7 or anthropic/claude-opus-4.7, the call errors out or the model refuses to load.
Solution:
Upgrade Claude Code to the latest version. Opus 4.7 is only supported from v2.1.111 onward. Run
claude --versionfirst — if it reports a lower version, upgrade before trying again (see the Install Claude Code section above; the native installer auto-updates, while Homebrew / WinGet require a manual upgrade command).Configure the model name correctly. Claude Code enforces a hardcoded check for Opus 4.7, so the model identifier must match exactly what it expects. Pick one of the following:
Option A (Recommended): Use the model alias. Following the Model Aliases guide, set the model to
claude-opus-4-7:bashexport ANTHROPIC_DEFAULT_OPUS_MODEL="claude-opus-4-7"Option B: Leave the model variables unset. Comment out or remove
ANTHROPIC_DEFAULT_*_MODELand let Claude Code fall back to its built-in defaults — the check never trips in that case.
After editing, reload your shell (source ~/.zshrc or source ~/.bashrc) and restart Claude Code.
Windows: Chinese Characters in Environment Variables
Issue: Garbled text appears when environment variables contain Chinese paths or values.
Solution:
Ensure the PowerShell Profile file uses UTF-8 with BOM encoding
Set the correct encoding in PowerShell:
powershell[Console]::OutputEncoding = [System.Text.Encoding]::UTF8If the issue persists, avoid using Chinese characters in environment variable values
More Models
See the ZenMux model list for all available models and detailed information.
Contact Us
If you run into any issues or have suggestions/feedback, feel free to contact us via:
- Website: https://zenmux.ai
- Support: [email protected]
- Business: [email protected]
- Twitter: @ZenMuxAI
- Discord: http://discord.gg/vHZZzj84Bm
For more contact options and details, visit our Contact Us page.