Pay As You Go
Welcome to the ZenMux Pay As You Go plan! This guide will help you understand the key benefits of Pay As You Go, and how to top up, manage your balance, and create production-grade API keys.
💡 Best for production
Pay As You Go is a usage-based billing plan built specifically for production. It offers no rate limits, no concurrency limits, production-grade stability, and transparent, precise billing.
What is Pay As You Go?
Pay As You Go is ZenMux’s billing plan tailored for enterprise customers and production use. Unlike subscription plans, Pay As You Go uses a prepaid balance + pay-as-you-consume model, so you only pay for the API usage you actually consume.
Key features
| Feature | Description |
|---|---|
| No Rate Limit | No per-minute request limit; supports high-concurrency workloads |
| Production-grade stability | SLA coverage plus an AI insurance compensation mechanism |
| Precise billing | Token-level billing for transparent and controllable costs |
| Enterprise services | Full request logs, cost analytics, and billing statistics |
Why choose Pay As You Go?
Use cases
Pay As You Go is especially suitable for:
- Commercial AI products already in production — no concurrency limits, stable and reliable
- AI services for end users — production-grade stability guarantees
- AI agent business systems — precise billing based on actual consumption
- Enterprise application integrations — predictable costs and auditable billing
Differences vs. subscriptions
| Dimension | Pay As You Go | Builder Plan (Subscription) |
|---|---|---|
| Best for | Production, commercial products | Personal development, learning & experimentation |
| Rate Limit | ✅ Unlimited | ⚠️ 10–15 RPM |
| Concurrency | ✅ Unlimited | ⚠️ Weekly Limit applies |
| Stability | ✅ Production-grade | Standard |
| Cost model | Precise usage-based billing | Fixed monthly fee |
| Usage restrictions | No special restrictions | ❌ Not allowed for production use |
⚠️ Important
If your project is already live or about to be commercialized, you must use Pay As You Go. The subscription plan (Builder Plan) is only for personal development and learning scenarios (Vibe Coding and Media Create scenarios) and must not be used in production. Violations may impact your account.
How to use Pay As You Go
Step 1: Sign in to the console
Go to the ZenMux Console and navigate to Manage > Pay As You Go.
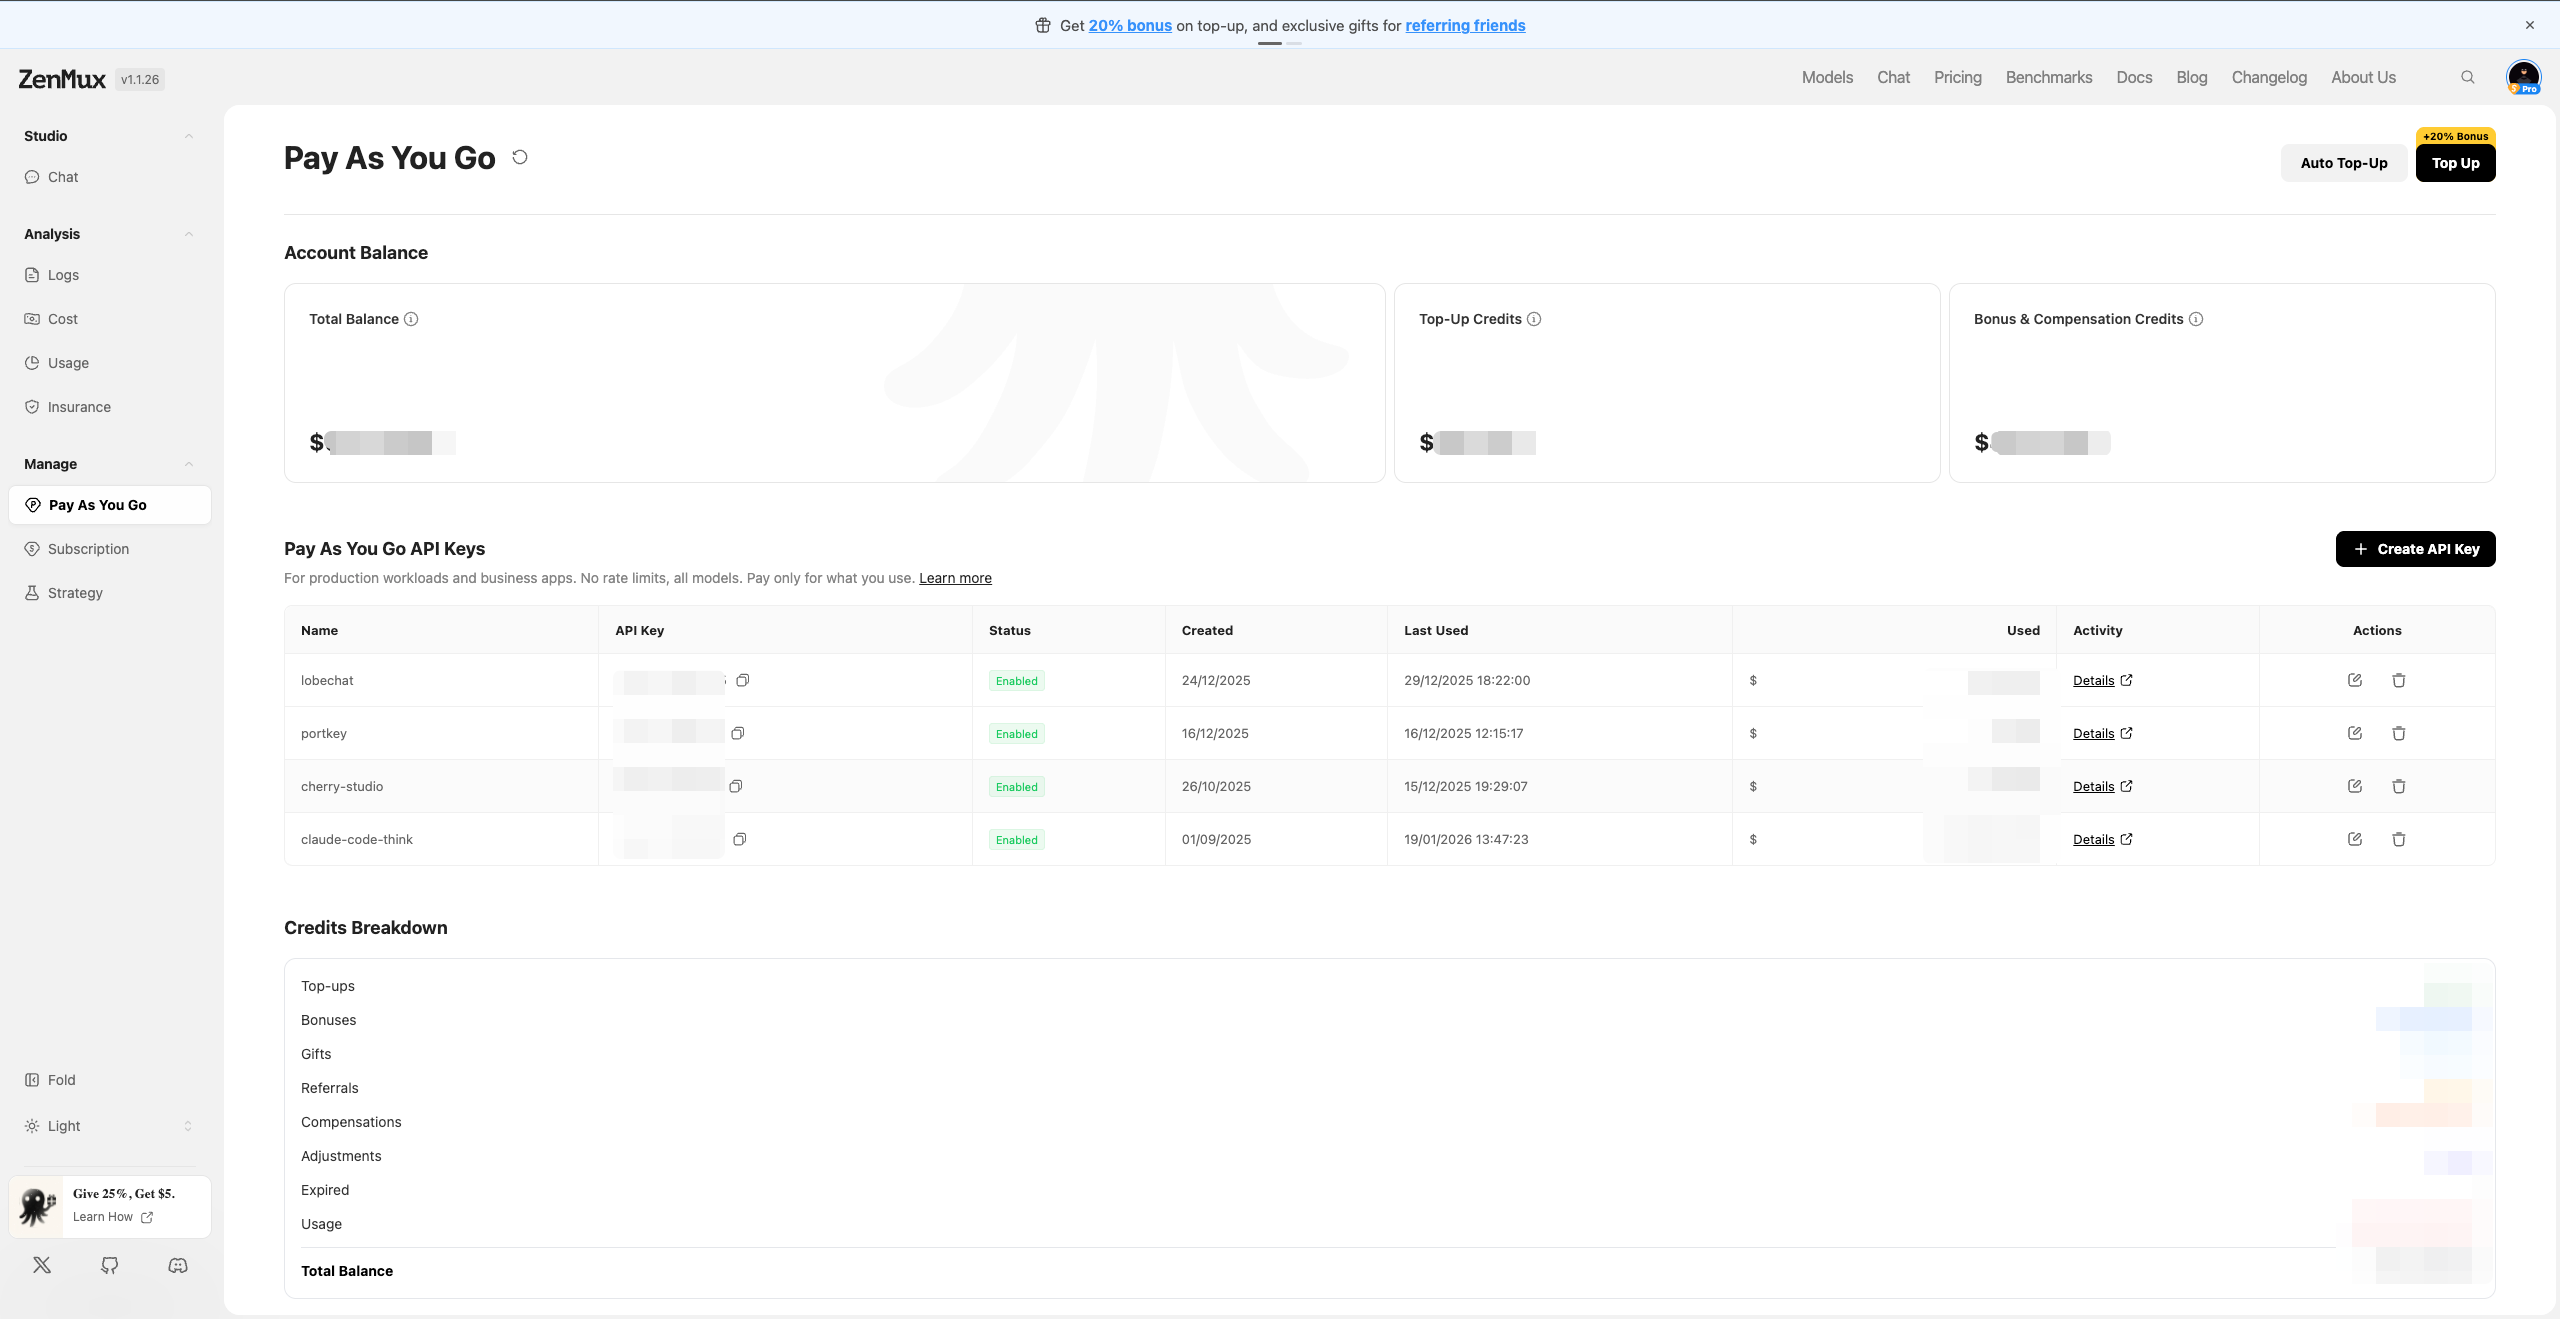
Step 2: Check your balance
At the top of the page, you’ll see three balance types:
- Total Balance: your current total available credits
- Top-Up Credits: credits obtained from top-ups
- Bonus & Compensation Credits: credits from top-up bonuses, referral rewards, insurance compensation, etc.
💡 Balance notes
All credits are denominated in USD ($). 1 credit equals $1 worth of API usage. During consumption, bonus credits are used first, then top-up credits.
Step 3: Top up your account
Manual top-up
- Click the Top Up button in the top-right corner
- Choose a top-up amount ($5 – $25,000; custom amounts supported)
- Complete payment (Stripe, Alipay, and more supported)
- After a successful top-up, credits are applied immediately with bonus credits added automatically
💡 Top-up benefits
- 0% service fee: ZenMux currently charges no service fee on top-ups
- Top-up bonus: every top-up includes bonus credits; the exact percentage is shown on the page
Create and manage API keys
Pay As You Go API keys are completely separate from subscription keys and are designed for production. In the Pay As You Go API Keys section, click + Create API Key to create a new key. You can also click Edit at any time to modify its configuration.

API key settings
| Setting | Description |
|---|---|
| Name | API key name — use a clear, descriptive name for easy identification |
| Tags | Tags for organizing and categorizing keys (e.g., production, frontend) |
| Key Status | Enable/Disable toggle. Disabling stops all requests using this key |
💡 API key best practices
- Create separate API keys for different projects/environments to simplify cost attribution and management
- Regularly review Last Used and Used to identify inactive or high-spend keys
- If you suspect a key has been leaked, immediately disable or delete it
Limits configuration
Turn on the Enable Limits toggle to set independent rate and spending limits for each API key, enabling fine-grained cost and access control:
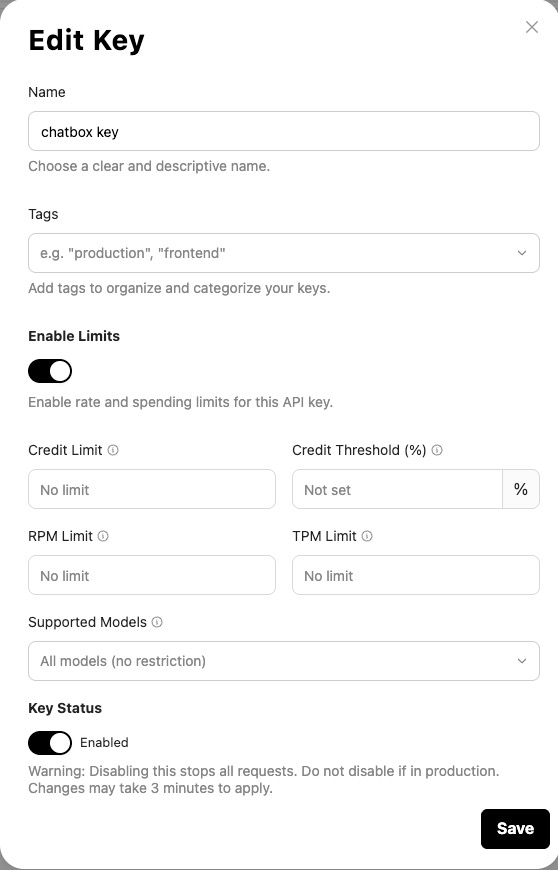
| Setting | Description |
|---|---|
| Credit Limit | Maximum credit allowance for this key. Requests are rejected once the limit is reached — useful for controlling per-project or per-customer budgets |
| Credit Threshold (%) | Credit threshold percentage. Triggers an email alert when usage reaches this ratio of the Credit Limit, for early warning |
| RPM Limit | Requests per minute limit — prevents traffic spikes or abuse |
| TPM Limit | Tokens per minute limit — controls token consumption rate for large model calls |
| Supported Models | Restrict which models this key can access. Defaults to All models (no restriction); can be set to allow only specific models |
⚠️ Caution
Disabling an API key immediately stops all requests using that key. Use caution in production environments. Changes may take up to 3 minutes to apply.
Call the API with a Pay As You Go API key
After creating an API key, you can use it in code to call the ZenMux API. The usage is exactly the same as in the quickstart guide—just replace it with your Pay As You Go API key:
from openai import OpenAI

client = OpenAI(
    base_url="https://zenmux.ai/api/v1",
    api_key="<YOUR PAY_AS_YOU_GO_API_KEY>",
)

completion = client.chat.completions.create(
    model="openai/gpt-5",
    messages=[
        {
            "role": "user",
            "content": "What is the meaning of life?"
        }
    ]
)

print(completion.choices[0].message.content)import OpenAI from "openai";
const openai = new OpenAI({
baseURL: "https://zenmux.ai/api/v1",
apiKey: "<YOUR PAY_AS_YOU_GO_API_KEY>",
});
async function main() {
const completion = await openai.chat.completions.create({
model: "openai/gpt-5",
messages: [
{
role: "user",
content: "What is the meaning of life?",
},
],
});
console.log(completion.choices[0].message);
}
main();📚 More usage
For complete API usage examples, see the Quickstart Guide.
Balance management and billing
View balance breakdown
Click the info icon next to Total Balance to view the Credits Breakdown:

The breakdown includes:
- Top-ups: your top-up records
- Bonuses: bonus credits from top-ups
- Gifts: credits granted by the platform
- Referrals: rewards earned from referring friends
- Compensations: AI insurance compensation credits
- Adjustments: manual credit adjustments by the platform
- Expired: expired bonus credits
- Usage: credits consumed by API calls
- Total Balance: current total available credits
Low Balance Alert
You can set up a low balance alert so that the system sends you an email when your balance drops below a custom threshold:
- On the Total Balance card, click the "Set Balance Alert" link in the top-right corner
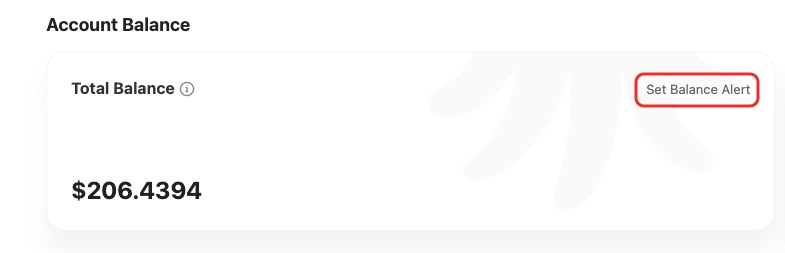
- Turn on the Low Balance Alert toggle

- Set a custom threshold amount (default: $3)
- When your balance drops below the threshold, the system will automatically send a notification to your registered email
View transaction history
In Transaction History, you can review all top-ups, usage, and compensation records:
| Column | Description |
|---|---|
| Date | Transaction date and time |
| Amount | Transaction amount |
| Type / Method | Transaction type |
| Description / Invoice | Transaction description or invoice link |
Common transaction types include:
| Type | Description |
|---|---|
| Stripe | Top-up via Stripe |
| Antom | Top-up via Antom |
| Discount | Bonus credits from top-ups |
| Gift | Credits granted by the platform |
| Referral | Rewards from referring friends |
| Insurance | AI insurance compensation |
| Refund | Refunds |
| Expire | Expired credits |
Click View Invoice to download the corresponding top-up invoice for reimbursements and billing audits.
FAQ
How can I avoid service interruptions due to insufficient balance?
Enable Low Balance Alert to receive email notifications when your balance drops below a custom threshold, so you can top up in time.
Can I use Pay As You Go and a subscription plan at the same time?
Yes. You can use the Builder Plan (Subscription) during personal development, and switch to Pay As You Go when going live or commercializing. API keys for the two plans are completely independent.
How long does it take for credits to arrive after topping up?
Credits are applied immediately after a successful top-up—no waiting required. The system also automatically adds bonus credits (the exact percentage is shown on the page).
How do I view usage details for a specific API key?
In the Pay As You Go API Keys list, click Details for the corresponding key to view detailed usage records and request logs.
How do I export invoices for company reimbursement?
In Transaction History, click View Invoice for the relevant top-up record to download an official top-up invoice (PDF), suitable for reimbursement and financial audits.
Next steps
Now that you understand how Pay As You Go works, you can:
- Read the Advanced Calling Guide to learn streaming, multimodal, and other advanced features
- Review the AI Insurance Docs to learn how to file claims
- Visit the Cost Analytics page for detailed cost attribution and usage trends
- Join the Discord community to connect with other developers
Contact us
If you run into any issues or have suggestions/feedback, feel free to reach us via:
- Website: https://zenmux.ai
- Support email: [email protected]
- Business email: [email protected]
- Twitter: @ZenMuxAI
- Discord: http://discord.gg/vHZZzj84Bm
For more contact options and details, visit our Contact page.